No matching documentation entries found
Try different keywords or browse the manual sections manually.
1. Introduction
Cute Web Email Extractor is a professional tool to harvest email addresses from search engines, websites, local files, and via an embedded chromium web browser. It includes advanced filters, proxy support, CAPTCHA handling, multi‑language UI, and auto‑save recovery.
Core Features
- Search engine extraction (Google, Bing, Yahoo, Baidu, Yandex)
- Batch crawl from custom website list
- Local file scanner (PDF, DOCX, XLSX, TXT, HTML, CSV, LOG)
- Built‑in browser mode for JavaScript‑heavy pages
- Real‑time email filters, domain validation, proxy rotation
- Auto‑save and session recovery
2. Getting Started
- Installation:
Installation
Install Cute Web Email Extractor and all required components.
-
1
Run the Installer
Launch the installation package to begin the setup process.
-
2
Follow the Setup Wizard
Complete the on-screen installation wizard by following the provided instructions.
-
3
Automatic Runtime Installation
If the required Chromium browser components are not already installed, the setup program will automatically download and install them.
-
4
Launch the Application
After installation is complete, launch the application from the Start Menu or desktop shortcut.
Important Note
Cute Web Email Extractor requires a Chromium-based browser runtime to properly render modern websites.
Supported Runtimes
- ✓ Microsoft Edge WebView2 Runtime Recommended
- ✓ Google Chrome
The installer automatically detects and installs any missing components. An active internet connection may be required during this process.
-
- First launch: Define an auto‑save directory (File → Set Auto‑save Directory) – essential for crash recovery.
See Section 10 for more detail - Activation: Click Activate Full version on the toolbar and enter your Purchase Order number.
See Section 8 for more detail - Language: Use the language dropdown on the toolbar (11 languages, RTL supported).


3. Main Window Overview
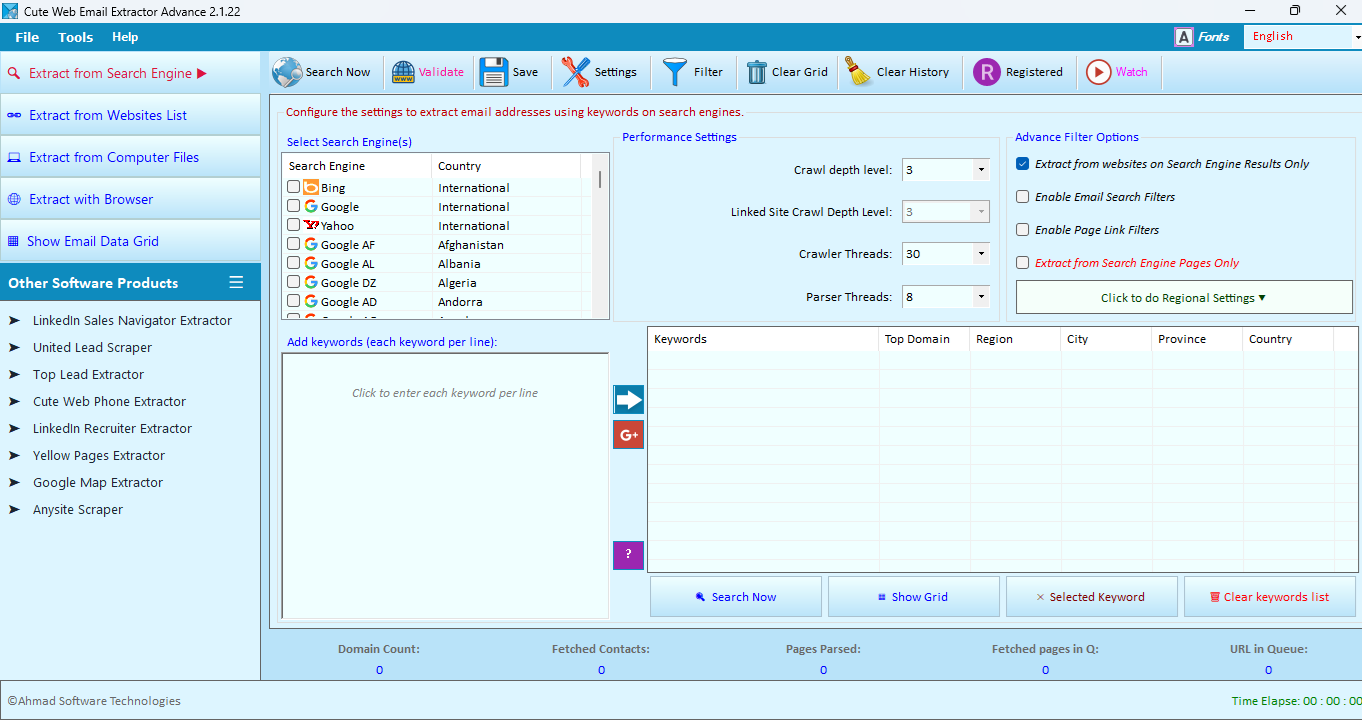
The Main Window is the central workspace where you configure extraction methods, manage searches, view results, and export collected email addresses.
Main application window.
Main Components
The main window is divided into four primary areas:
1. Extraction Panel
Select the extraction method such as Search Engine, Websites List, Computer Files, or Browser Mode.
2. Toolbar
Provides quick access to search, validation, settings, filtering, and data management functions.
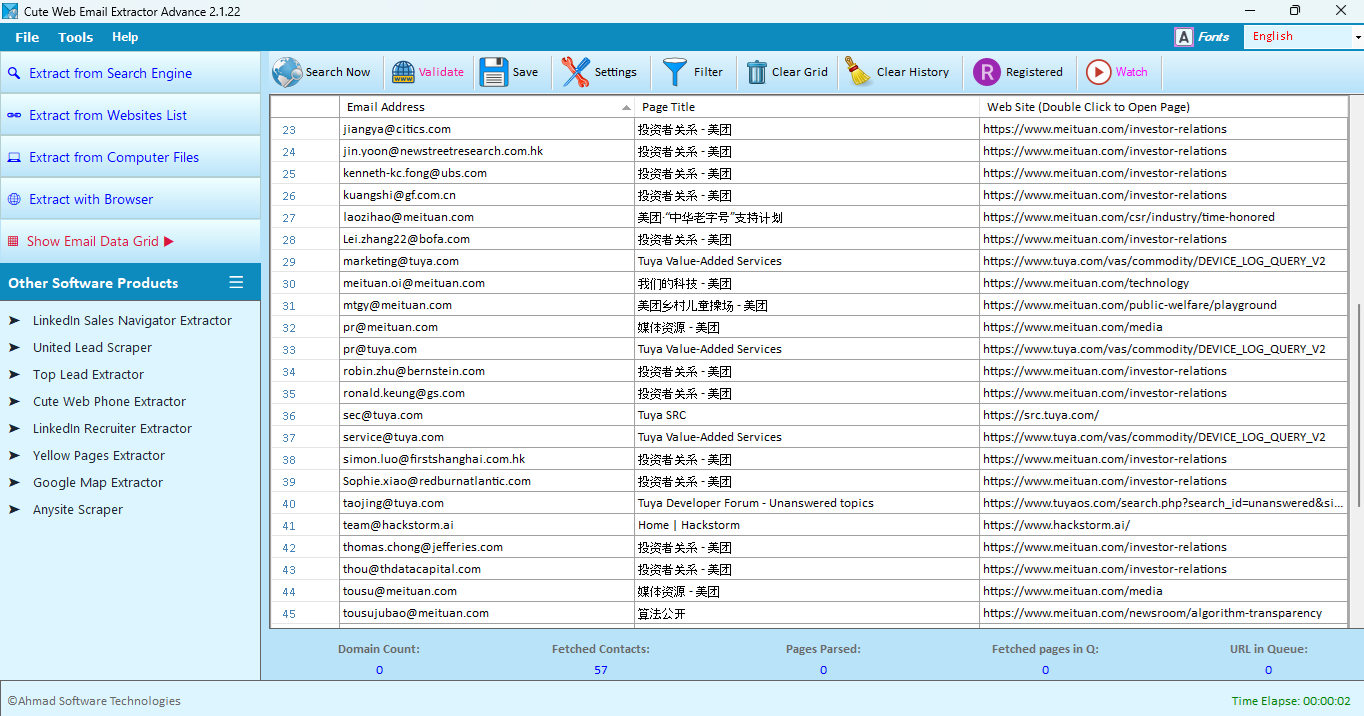
3. Results Grid
Displays extracted email addresses, page titles, and website URLs.
4. Statistics Bar
Shows crawl progress, extracted contacts, parsed pages, and queue information.
Extraction Methods
Extract from Search Engine
Searches Google, Bing, Yahoo, Baidu, and other supported search engines using keywords and automatically extracts email addresses from discovered websites.
Extract from Websites List
Processes a list of URLs and extracts email addresses directly from the specified websites.
Extract from Computer Files
Extracts email addresses from local files including DOC, Excel, TXT, HTML, PDF, CSV, and other supported formats.
Extract with Browser
Uses Chromium browser rendering to process JavaScript websites and dynamic web pages.
Toolbar Functions
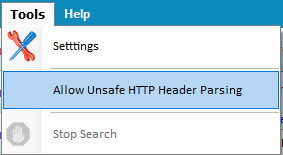
Figure 4.2. Software Toolbar.
Search Now
Starts the extraction process.
Validate
Verifies extracted email addresses.
Save
Exports extracted data to supported formats.
Settings
Opens software configuration options.
Filter
Applies advanced email and domain filters.
Clear Grid
Removes all displayed results.
Clear History
Clears stored extraction history.
Registered
Displays license information and subscription status.
Results Grid
The Results Grid displays all extracted contacts and related information.
| Column | Description |
|---|---|
| Email Address | Extracted email address. |
| Page Title | Title of the page where the email was found. |
| Website | Source URL containing the email address. |
Statistics Panel
The statistics panel at the bottom of the window provides real-time information about extraction progress.
- Domain Count: Number of unique domains discovered.
- Fetched Contacts: Total email addresses extracted.
- Pages Parsed: Number of processed web pages.
- Fetched Pages in Queue: Pages waiting to be processed.
- URL Queue: Remaining URLs scheduled for crawling.
- Time Elapsed: Duration of the current extraction session.
📄 4. File Menu – Complete Reference
The File menu contains essential commands for saving your data, managing backups, restoring previous sessions, and exporting logs. Each option is described below.
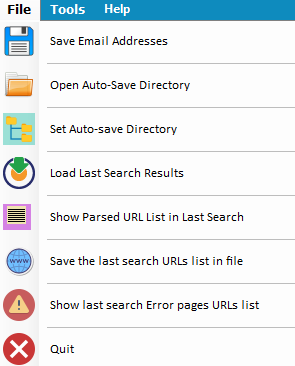 Cute Web Email Extractorf" class="block border-2 border-slate-300 rounded-lg shadow-sm lazy-image" onerror="...">
File Menu
💾 4.1 Save Email Addresses
Exports the currently displayed email grid to a file on your local disk.
- Microsoft Excel (.xlsx)
- CSV (comma‑separated values)
- Plain text (.txt)
- Choose which columns to save: Serial number, Email address, Page Title, Website URL
- Select text encoding: Unicode (UTF‑8) or ANSI
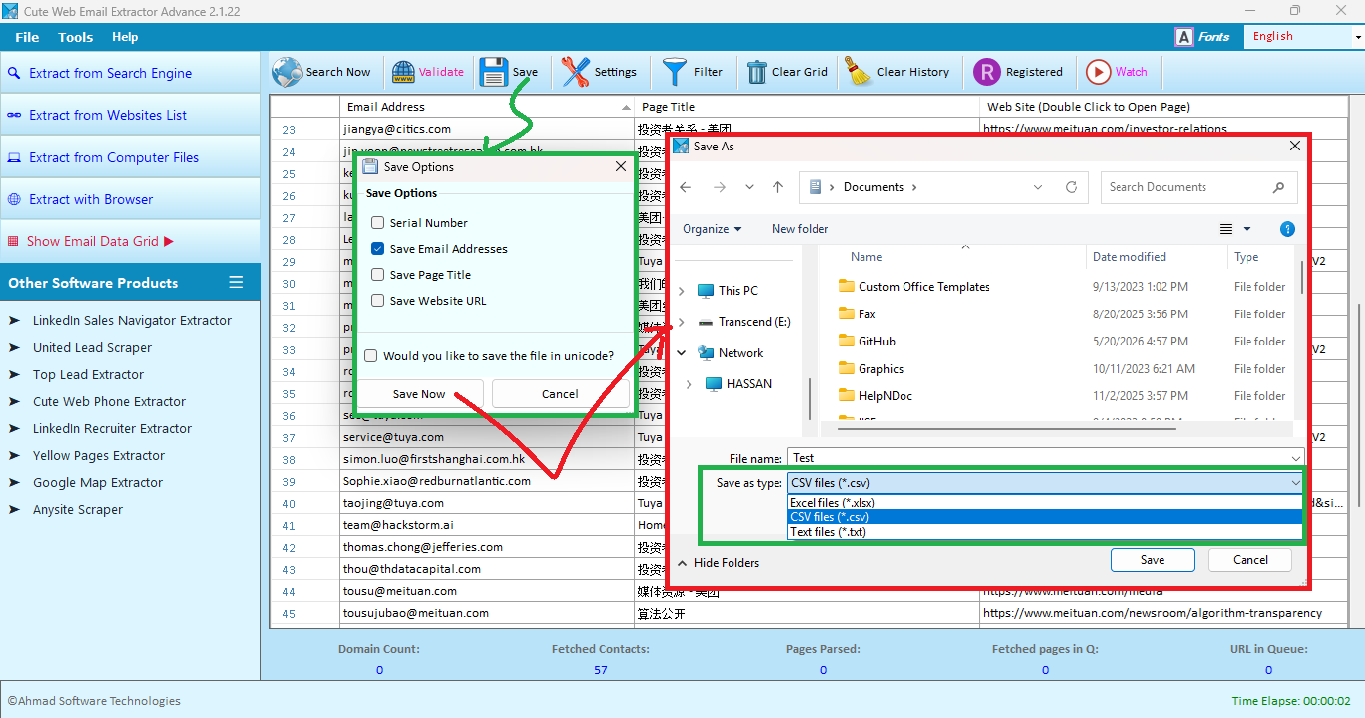
Save dialog (Excel, CSV, TXT options)
📂 4.2 Open Auto‑Save Directory Structure
Opens the auto‑save folder in Windows Explorer. This folder contains:
GridData.csv– backup of extracted emailsErrorURLs.txt– list of failed pagesstats.dat– last session statisticsCuteWebExtractor.adb– SQLite database with crawl queueHistory Folder– It contains previous searches extracted data. Before starting new search software copies GridData.csv in the directory and GridData is appended with current date and time.HistoryDB Folder– It contains previous searches database containing previous search web URLs. Before starting new search software copies CuteWebExtractor.csv in the directory and CuteWebExtractor is appended with current date and time.
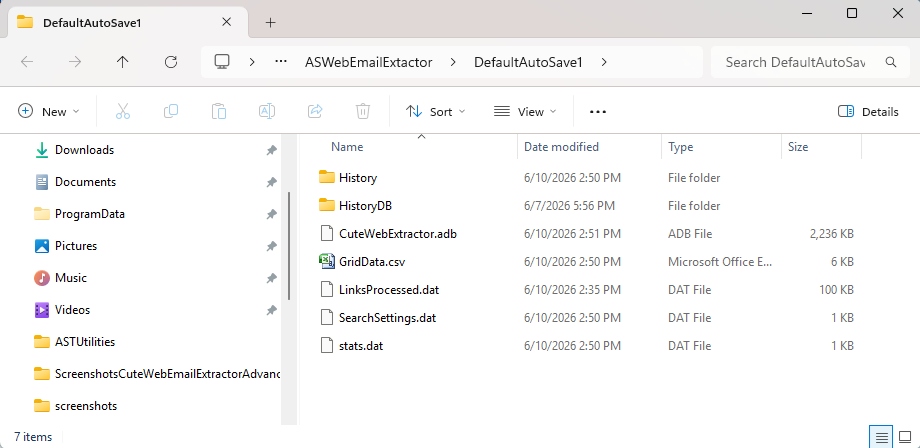
Auto Save directory structure
⚙️ 4.3 Set Auto‑save Directory
Opens the Auto Save Directories management dialog. Here you can:
- See existing backup folders (e.g.,
DefaultAutoSave,DefaultAutoSave-1) - Create a new auto‑save folder by typing a name and clicking Add new directory
- Delete a selected directory
- Check “Never show again and use the default auto‑save directory” to skip future prompts
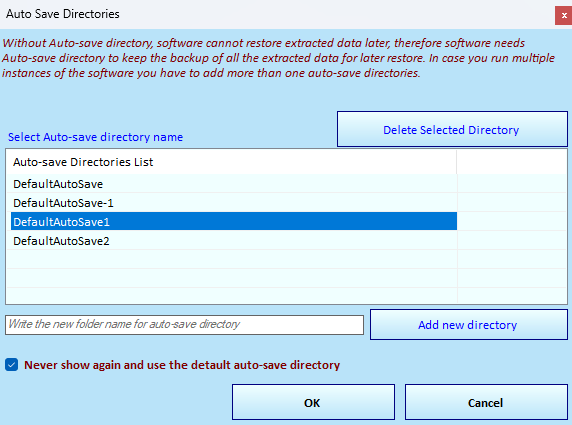
Auto‑save directory content
🔄 4.4 Load Last Search Results
Restores the previous extraction session from the currently selected auto‑save directory. The following data is reloaded:
- All extracted emails (reconstructs the grid)
- Processing queue (crawled pages, waiting URLs)
- Error logs and parsed URL lists
Use this feature after a crash, accidental close, or when you want to continue where you left off.
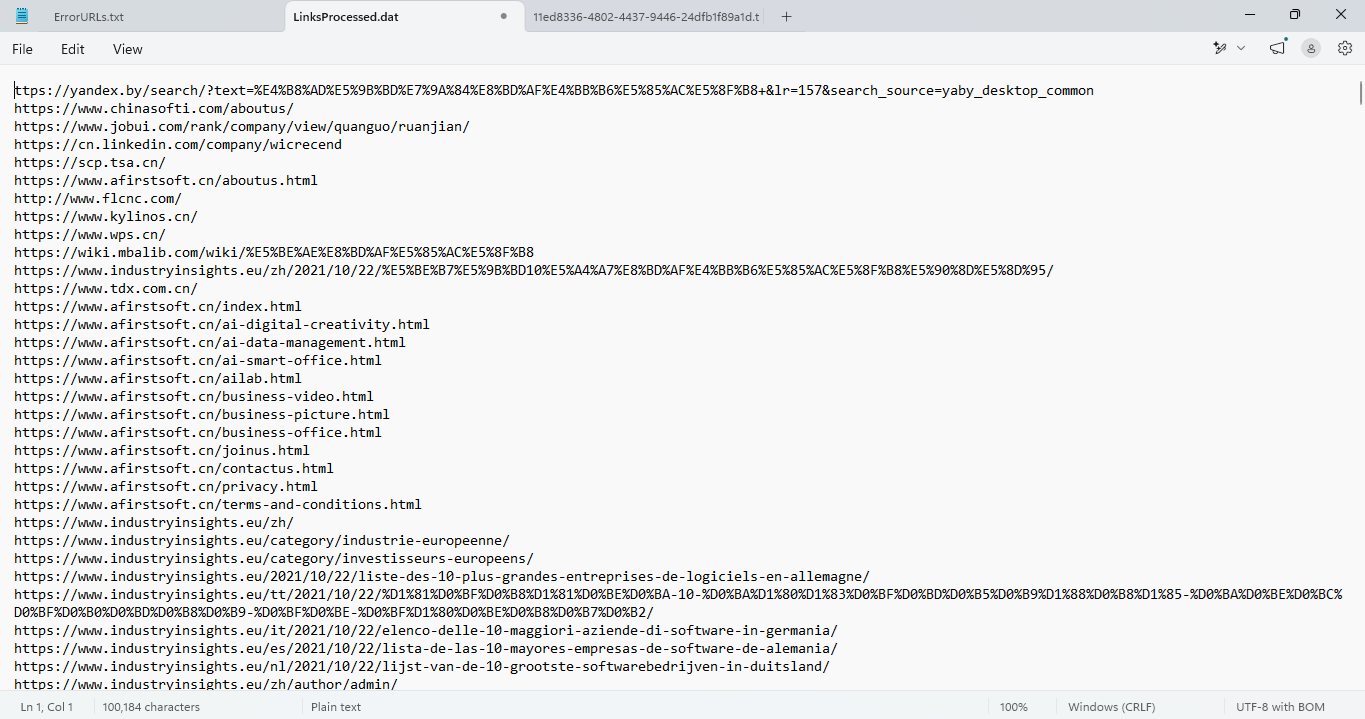
📜 4.5 Show Parsed URL List in Last Search
Opens a text file containing all URLs that were successfully processed (status = 2) during the last search. Each URL is listed on a separate line. This is useful for auditing which pages were actually crawled.
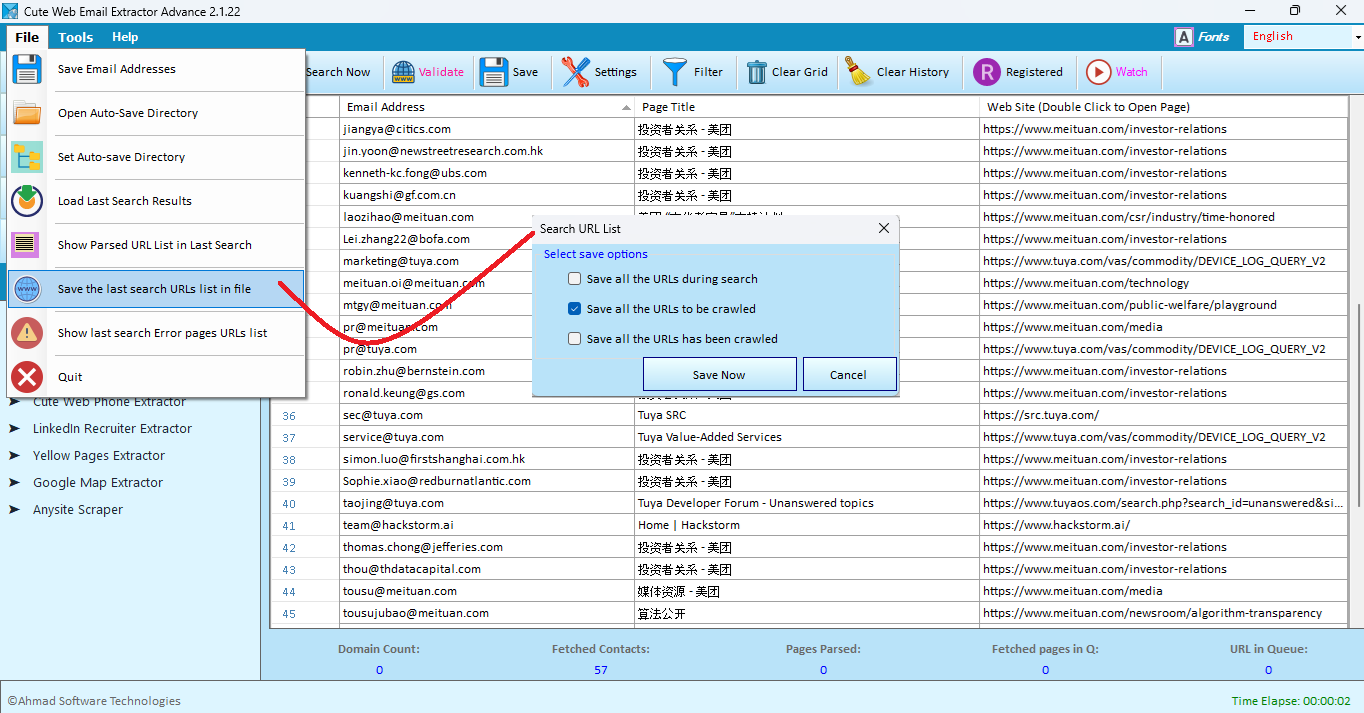
💿 4.6 Save the last search URLs list in file – Export Options
When you click this menu item, a dialog titled “Select save options” appears. It allows you to choose which subset of URLs to export.
Exports all URLs that have been discovered or processed during the current search session, regardless of their status (pending, crawling, parsed, or failed). This gives you a complete history of every URL the crawler has encountered.
Exports only the URLs that are still waiting in the crawl queue (status = pending). Useful if you want to resume the crawl later or inspect the remaining work.
Exports only the URLs that have already been successfully processed (status = completed). This gives you a clean list of pages that have been fully parsed.
Typical use cases
- “Save all the URLs during search” – Audit all discovered links, debug crawler behaviour.
- “Save all the URLs to be crawled” – Backup the remaining queue before stopping a long extraction.
- “Save all the URLs has been crawled” – Keep a permanent record of successfully visited pages for later reference.
| Option | Exported URL Status | File Content Example |
|---|---|---|
| Save all the URLs during search | All discovered (pending + processing + completed + failed) | https://example.com/page1 |
| Save all the URLs to be crawled | Only pending / queued | https://example.com/deep-link-1 |
| Save all the URLs has been crawled | Only successfully processed (status = 2) | https://example.com/home |
⚠️ 4.7 Show last search Error pages URLs list
Opens a text file listing all URLs that failed to load during the last extraction. Error types include:
- HTTP errors (404, 500, etc.)
- Timeouts
- Connection refused
- CAPTCHA or blocking pages
Use this list to manually check problematic domains or adjust crawling settings (delay, proxy, browser rendering).
❌ 4.8 Quit
Exits the application. If an extraction is running, a confirmation dialog will appear. Partial results are saved only if auto‑save is enabled.
Quick Reference – File Menu Actions
| Menu Item | Primary Use |
|---|---|
| Save Email Addresses | Export grid to file |
| Open Auto‑Save Directory | Open backup folder |
| Set Auto‑save Directory | Manage backup folders |
| Load Last Search Results | Restore previous session |
| Show Parsed URL List | View successful URLs |
| Save last search URLs list | Export crawl list |
| Show Error pages URLs list | View failed URLs |
| Quit | Exit software |
5. Tools Menu
- Settings: Opens the full configuration dialog (see section 12).
- Allow Unsafe HTTP Header Parsing: Enables non‑standard headers (advanced).
- Stop Search: Immediately halts extraction, saves partial results.
Cute Web Email Extractorf" class="block border-2 border-slate-300 rounded-lg shadow-sm lazy-image" onerror="...">
Toots Menu of Cute Web Email Extractorf
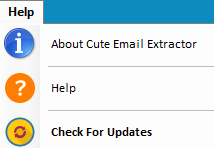
6. Help Menu
- About Cute Email Extractor: Version, contact aslogger@ahmadsoftware.com.
- Help: Opens online documentation.
- Check For Updates: Auto‑download newer version.
 Cute Web Email Extractorf" class="block border-2 border-slate-300 rounded-lg shadow-sm lazy-image" onerror="...">
Helop Menu
🔍 7. Email Filters Dialog (Post‑Extraction)
This dialog allows you to filter already extracted email addresses without re‑running the extraction. Access it by clicking the Filter button on the main toolbar
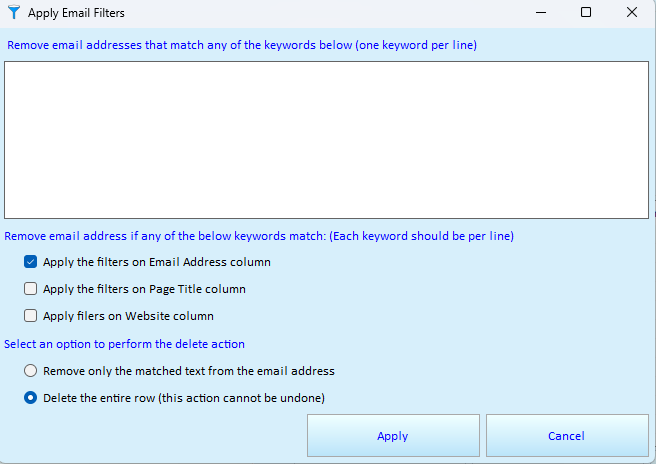
Apply Email Filters dialog as shown in the software
⚙️ Filter Options
Enter keywords or phrases, one per line. The filter is case‑insensitive. Any row that contains at least one of these keywords (in the selected columns) will be processed according to the chosen action below.
Example: @example.com, abuse, noreply
- Email Address column – check to filter based on the email itself.
- Page Title column – check to filter based on the webpage title.
- Website column – check to filter based on the source URL.
You can select one, two, or all three columns. If multiple columns are selected, a match in any of them will trigger the action.
Deletes the matched keyword(s) from the email string, but keeps the row. For example, if the keyword is “noreply” and the email is noreply@example.com, it becomes @example.com. The row remains in the grid.
Completely removes any row that matches the keywords in the selected columns. This is irreversible – the data is lost unless you have saved the grid before filtering.
📖 Example: Removing all emails from a specific domain
- Add the keyword:
@example.com - Check “Apply the filters on Email Address column”
- Select “Delete the entire row”
- Click Apply
All rows where the email contains @example.com will be permanently deleted from the grid.
Field Reference
| Field / Control | Description |
|---|---|
| Remove email address if any of the below keywords match | Multi‑line text box. Each line is a keyword. The filter matches if any keyword is found (partial match, case‑insensitive). |
| Apply the filters on Email Address column | When checked, the email column is included in the search. |
| Apply the filters on Page Title column | When checked, the page title column is included. |
| Apply filters on Website column | When checked, the website (URL) column is included. |
| Remove only the matched text from the email address | Action that removes the matching substring(s) from the email address but keeps the row. |
| Delete the entire row (this action cannot be undone) | Action that removes the whole row from the grid permanently. |
| Apply | Executes the filter with the current settings. |
| Cancel | Closes the dialog without making any changes. |
🔑 8. Software Registration Dialog
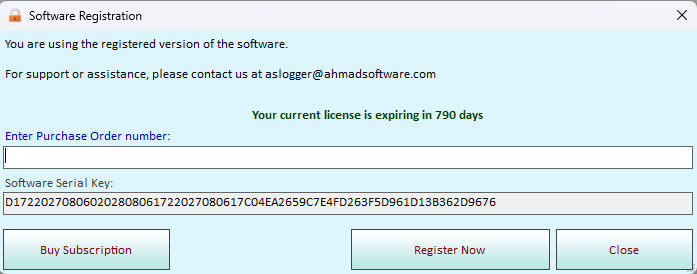
The Registration dialog is accessed by clicking the Activate Full version button on the main toolbar. It displays your license status and allows you to activate or renew the software.
 Cute Web Email Extractor)" class="block border-2 border-slate-300 rounded-lg shadow-sm lazy-image" onerror="...">
Software Registration dialog
📜 License Information & Activation
Shows whether you are using a registered version. Example: “You are using the registered version of the software.” If unregistered, a trial message appears.
Email address for assistance: aslogger@ahmadsoftware.com – clickable link available in the actual dialog.
Displays the number of days remaining on your current license (if subscription‑based). Example: “Your current license is expiring in 790 days”.
Text field where you paste or type the order ID received after purchasing the software. This is required for online activation.
A hardware‑based unique identifier (automatically generated). It is displayed here and can be used for offline activation if internet is unavailable.
- Buy Subscription – Opens the purchase page in your default web browser to renew or upgrade your license.
- Register Now – Validates the entered Purchase Order number online. If valid, the software unlocks all features and the dialog shows “Registered”.
- Close – Closes the registration dialog without making any changes.
- Click Activate Full version on the main toolbar.
- In the Registration dialog, enter your Purchase Order number.
- Click Register Now (requires internet connection).
- After successful validation, the software becomes fully registered and the button changes to “Registered”.
📋 Field Reference – Registration Dialog
| Field / Control | Description |
|---|---|
| License Status text | Indicates registration state (registered / trial / expired). |
| Support email link | aslogger@ahmadsoftware.com – opens default email client. |
| Expiring in X days | Days left on subscription (only shown for registered users). |
| Enter Purchase Order number | Input field for the order ID (alphanumeric). |
| Software Serial Key | Read‑only hardware ID, used for offline activation. |
| Buy Subscription | Opens purchase website. |
| Register Now | Triggers online license validation. |
| Close | Closes the dialog. |
9. Extraction Modes
🌐 9.1 Search Engine Extraction Mode
This mode extracts email addresses by submitting keywords to one or more search engines (Google, Bing, Yahoo, Baidu, Yandex, etc.) and then crawling the resulting pages and linked websites.
⚙️ Configuration Options
A list of available search engines with checkboxes. You can select one or multiple. The software will query each selected engine separately and combine results.
- Bing – Microsoft Bing search engine
- Google – Google search (requires browser rendering for best results)
- Yahoo – Yahoo search
- Additional engines (Baidu, Yandex, etc.) may appear based on your configuration.
⚡ Performance Settings
Specifies how many levels of links the software will follow after opening a search result. Higher values allow deeper website exploration and may discover additional email addresses, but will increase crawling time.
Controls how deeply the software crawls pages after leaving the original search result website and following links to other domains.
Higher values increase coverage but may significantly increase crawl duration.
Specifies the number of simultaneous connections used to download web pages. Increasing this value can improve extraction speed but may cause websites to block or rate-limit requests.
Determines how many threads are used to analyze downloaded pages and extract email addresses and contact information.
For best performance, this value should normally be lower than the Crawler Threads setting.
🎛️ Advanced Filter Options
Extract from Websites on Search Engine Results Only
Limits extraction to the websites that appear directly in the search engine results. The software will visit each result page but will not follow additional links within those websites.
Enable Email Search Filters ↗ see Section 14
Opens the Email Search Filters dialog where you can define keywords that must appear on a page before email addresses are extracted.
Enable Page Link Filters ↗ see Section 14
Opens the Page Link Filters dialog where you can specify keywords that must be present on a page before the crawler follows links found on that page.
Extract from Search Engine Pages Only
Restricts extraction to the search engine results pages themselves. The software will not visit any external websites.
Recommendation
For most email extraction projects, leave Extract from Search Engine Pages Only disabled and use a crawl depth of 3. This provides the best balance between search coverage and extraction accuracy.
🌐 Regional Settings
Opens the Regional Settings dialog, allowing you to target searches to specific geographic locations. Regional targeting helps improve search relevance and discover websites associated with a particular country, region, city, or local area.
Available Location Filters
Restrict searches to a specific country.
Focus searches within a selected state or province.
Target up to three cities simultaneously.
Further narrow searches to a specific local area.
Additional Options
Instructs the search engine to prioritize results matching the selected regional settings whenever possible.
Extract emails only from websites using country-specific top-level domains such as .us, .uk, .ca, .au, or .de.
Example
To find business email addresses in Sydney, Australia, select: Country = Australia, State = New South Wales, and City = Sydney. This helps return more locally relevant websites and contacts.
📝 Keywords List
The Keywords List contains all search queries that will be submitted to the selected search engines. Each row represents a separate search task and can include optional location and domain restrictions to improve targeting accuracy.
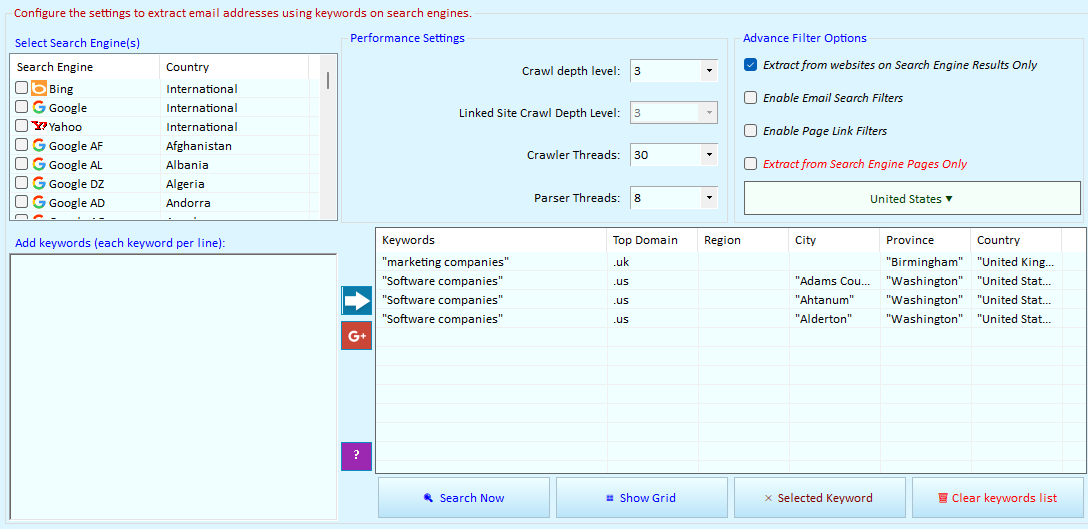
Figure 1. Keywords List containing search phrases and optional targeting information.
Available Columns
Keywords
The primary search phrase used when querying search engines. This field is required.
Top Domain
Restricts results to a specific country top level domain.
Region
Specifies a geographic region to improve search relevance.
City
Restricts searches to a specific city or metropolitan area.
Province / State
Narrows searches to a selected province or state.
Country
Restricts searches to websites associated with a specific country.
⚙️ Managing Keywords
Add
Create a new search query by entering keywords and optional targeting information.
Delete
Remove the selected keyword entry from the list.
Example
| Keywords | City | Country |
|---|---|---|
| dentist | London | United Kingdom |
This query will prioritize websites related to dentists located in London, United Kingdom.
💡 Tip
Using location fields together with Regional Settings can significantly improve search accuracy and reduce unrelated results.
- Search Now – starts the extraction using the current configuration (changes to Stop Search while running).
- Show Grid – switches the right panel to the email results grid.
- Selected Keyword – applies the currently highlighted keyword row to the search engine query (useful for testing one keyword at a time).
- Clear keywords list – removes all keyword rows.
📋 Complete Field Reference – Search Engine Mode
| Field / Control | Description |
|---|---|
| Search Engine checkboxes | Select which engines to query (Bing, Google, Yahoo, etc.) |
| Country dropdown (per engine) | Localise search results to a specific country. |
| Crawl depth level | How many link levels to follow inside each discovered website. |
| Linked Site Crawl Depth Level | Depth for external domains (different from the starting domain). |
| Crawler Threads | Concurrent HTTP request threads (30 recommended). |
| Parser Threads | Concurrent HTML parsing threads (8 recommended). |
| Extract from websites on Search Engine Results Only | Do not follow internal links; only process the result URLs themselves. |
| Enable Email Search Filters | Opens a dialog to set page‑level email extraction filters – see Section 14. |
| Enable Page Link Filters | Opens a dialog to set page‑level link‑following filters – see Section 14. |
| Extract from Search Engine Pages Only | Never leave the search engine result pages. |
| Click to do Regional Settings | Advanced location targeting (country, state, city, area). |
| Keywords list (6 columns) | Search phrases with optional domain, region, city, province, country. |
| Search Now / Stop Search | Start or stop the extraction process. |
| Show Grid | Switch to the email results view. |
| Selected Keyword | Execute only the selected keyword row. |
| Clear keywords list | Delete all keyword rows. |
💾 9.2 Extract from Websites List
Learn how to extract email addresses directly from a targeted list of URLs or domains using custom crawling preferences as shown in screenshot.
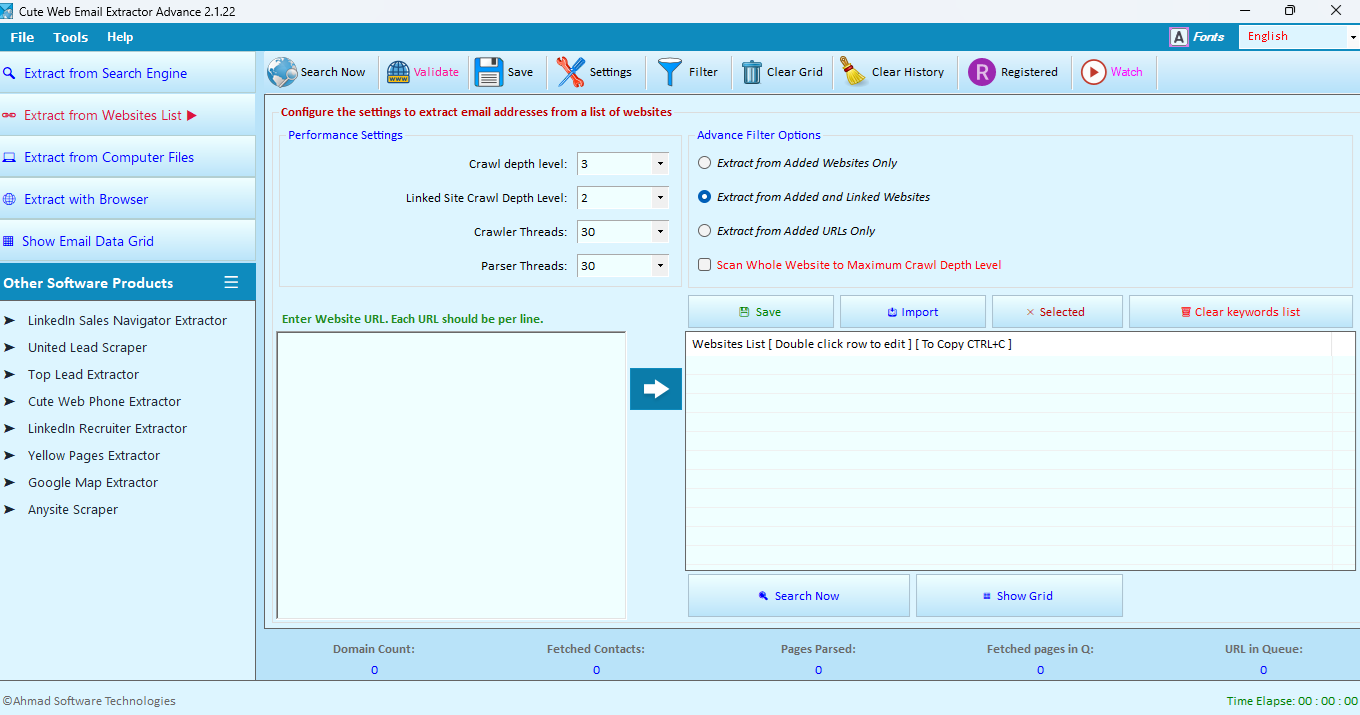
Figure 1. website list based search screen.
Access the Feature
On the left-hand navigation panel, click on Extract from Websites List. This will open the primary configuration dashboard.
Configure Performance Settings
Optimize how the software handles resources and web crawling:
Defines how many levels deep the crawler navigates within the initial domain.
Defines how deep the crawler navigates into external linked sites.
Adjusts parallel processing speeds. Higher numbers increase extraction speed but demand more system resources.
Set Advance Filter Options
Choose how strictly the crawler follows web paths via the configuration radio buttons:
- Extract from Added Websites Only: Restricts searches strictly to your provided root domains.
- Extract from Added and Linked Websites: Expands scanning to external links originating from target domains.
- Extract from Added URLs Only: Targets the exact URL path without jumping deeper.
Input Your Target Websites
Populate your targeting grid using one of two methods:
Type or paste line-separated URLs into the text box, then click the blue arrow button (➔) to push them to the grid.
Click the Import button above the right-hand grid to upload an external URL file (.txt/.csv).
Start the Extraction
Click the Search Now button on the top toolbar or below the grid to initialize extraction. Toggle Show Grid to view results in real-time.
Use the Selected button to target and drop broken/unwanted entries mid-session, or use Clear keywords list to reset your space cleanly.
💾 9.3 Computer Files Extraction Mode
This mode extracts email addresses (or website URLs) directly from local files and folders without crawling the web. It supports a wide range of file types, including text files, PDFs, Office documents, and more.
⚙️ Configuration Options
The Files List contains all files and folders that will be processed during extraction. Files are scanned in the order shown in the list.
- Double‑click a row to edit the file path directly.
- Ctrl+C to copy the selected row(s) to clipboard.
- Files are processed in the order they appear.
- Folders are scanned recursively (all supported files inside).
Searches for email addresses within the file content. This is the default mode.
Extracts all website URLs (http, https, ftp, www) found in the files, instead of email addresses.
- Browse Files – Opens a file picker to select individual files (supports multi‑selection).
- Browse Directory – Opens a folder picker; all supported files inside the folder (and subfolders) will be added recursively.
- Clear List – Removes all entries from the Files List.
- Search Now – Starts the extraction process on the selected files/folders (button changes to Stop while running).
- Show Grid – Switches the right panel to the email results grid (or URL results, depending on mode).
Office files (DOCX, XLSX, PDF) are parsed using internal libraries; large files are processed in chunks to avoid memory issues.
📋 Complete Field Reference – Computer Files Mode
| Field / Control | Description |
|---|---|
| Files List | Displays all selected files/folders. Double‑click to edit path, Ctrl+C to copy. |
| Browse Files | Open file picker – select one or more files. |
| Browse Directory | Open folder picker – recursively add all supported files. |
| Clear List | Remove all entries from the Files List. |
| Extracted Email Addresses Only | Search for email addresses in the files. |
| Extracted Website Links Only | Extract website URLs instead of emails. |
| Search Now / Stop | Start or stop the extraction process. |
| Show Grid | Switch to the email/URL results grid. |
📖 Example: Extract emails from a folder of PDFs and Excel files
- Click Browse Directory and select a folder containing PDF and XLSX files.
- Select “Extracted Email Addresses Only”.
- Click Search Now.
- The software will scan all supported files in the folder (recursively) and display any found email addresses in the grid.
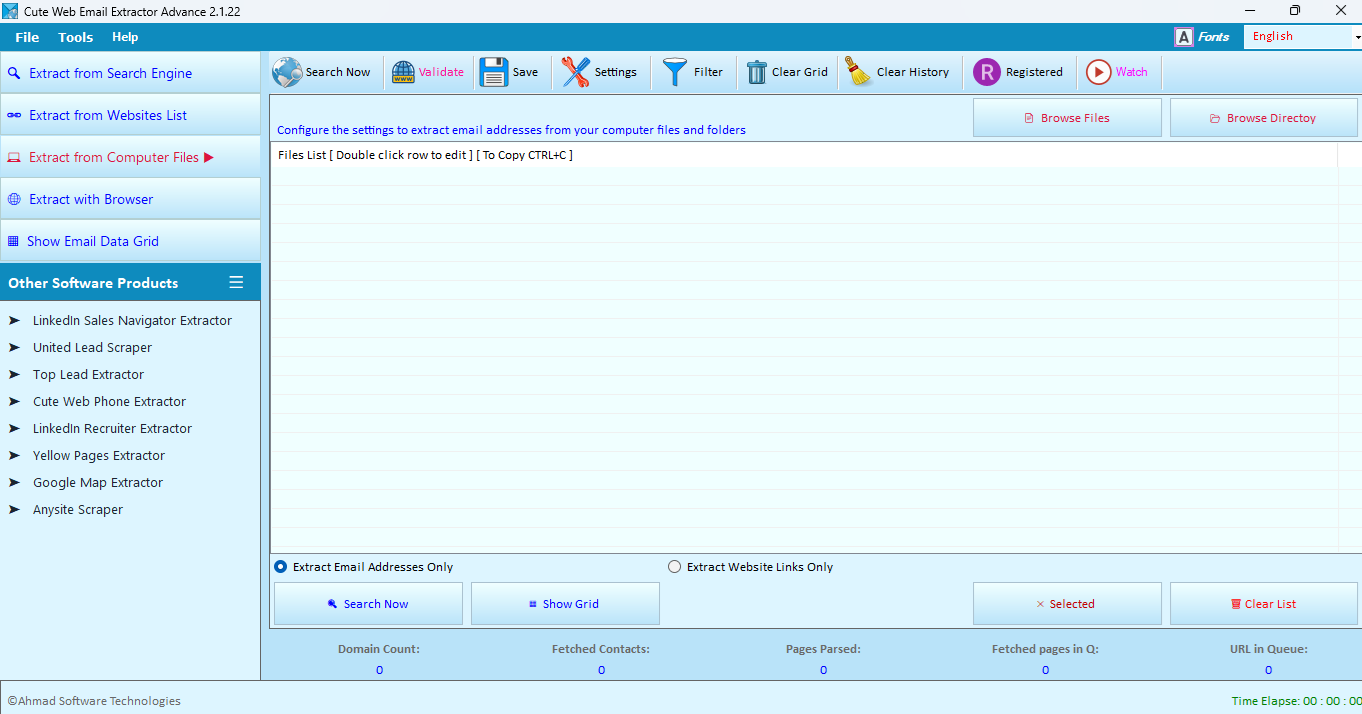 📸 Screenshot: Computer Files configuration panel (as shown in the software)
🌍 9.4 Extract with Browser Mode
This mode uses an embedded Web browser (Microsoft Edge or Chromium) to render web pages exactly as a real user would see them. It is ideal for:
- Websites that rely heavily on JavaScript (Single‑Page Applications, infinite scroll, dynamic content).
- Pages that require login, form submission, or user interaction before content is revealed.
- Scraping data behind authentication walls (e.g., internal company portals).
- Bypassing simple anti‑bot measures that block standard HTTP crawlers.
⚙️ Browser Interface & Controls
At the top of the browser panel, you will find:
- URL text box – type or paste any web address (e.g.,
https://example.com). - Go button – click to navigate to the entered URL. While a page is loading, the button changes to Stop (cancels navigation).
- Back / Forward buttons (if present in the toolbar) – navigate through browsing history.
After navigating, you can interact with the page normally: click links, fill forms, log in, scroll, and even solve CAPTCHAs manually.
The main area displays the fully rendered web page, including:
- JavaScript execution (Angular, React, Vue, etc.)
- CSS styling, images, videos, and interactive elements.
- Infinite scroll – you can manually scroll to load more content, then let the software extract from the fully loaded page.
- Popup dialogs (alerts, confirmations) are automatically suppressed to avoid interruption.
- Navigate to the desired starting page (e.g., a search results page after logging in).
- Perform any necessary actions: click “Load more”, fill a form, scroll to reveal content, etc.
- Click the main toolbar’s Search Now button (not the “Go” button).
- The software will extract emails from the current page and then follow links according to the crawl depth settings that correspond to the type of page currently displayed in the browser:
- If the current page is a search engine results page (e.g., Google, Bing, Yahoo), the software automatically applies the Search Engine mode crawl depth settings (from the “Crawl depth level” and “Linked Site Crawl Depth Level” under Performance Settings in the Search Engine tab).
- If the current page is a normal (non‑search‑engine) website, the software automatically applies the Websites List mode crawl depth settings (from the “Crawl depth level” and the selected crawl type – “Scan Whole Website”, “Added and Linked Websites”, etc. – in the Websites List tab).
No manual selection is required – the detection happens automatically based on the URL and domain of the page you are viewing.
- Results appear in the email grid. You can stop the extraction at any time by clicking Stop Search.
Browser‑based extraction consumes more CPU and memory than standard HTTP crawling. Recommendations:
- Reduce the number of concurrent browser pages (Settings → Crawl Engine) to 2‑4 on older machines.
- Enable “Do not load images” and “Do not load videos” in the Crawl Engine tab to speed up page loading.
- For large sites, combine browser mode with a shallow crawl depth (1 or 2) to avoid excessive resource consumption.
📋 Complete Field Reference – Browser Mode
| Control / Element | Description |
|---|---|
| URL address bar | Enter any web address (http:// or https://). Auto‑completes from history. |
| Go button | Load the entered URL. While loading, the button changes to “Stop” to cancel navigation. |
| Page rendering area | Displays the fully interactive web page (JavaScript, CSS, forms, etc.). |
| Back / Forward (if present) | Navigate through the browser history. |
| Search Now (main toolbar) | Starts email extraction from the current page. The software automatically detects whether the page is a search engine results page or a normal website and applies the corresponding crawl depth settings. |
| Stop Search | Halts the extraction process (button toggles from “Search Now”). |
| Show Grid | Switches the right panel to the email results grid. |
📖 Example: Extracting emails from a LinkedIn search after login
- Click Extract with Browser to open the browser panel.
- Navigate to
https://www.linkedin.com/loginand log in manually. - After login, perform a search for “marketing managers”.
- Scroll down the results page to load all visible profiles.
- Click the main toolbar’s Search Now button.
- The software automatically detects that the current page is a search engine (LinkedIn search) and applies the Search Engine mode crawl depth settings. It will extract all email addresses visible on the current page and follow profile links according to the configured depth.
- Emails appear in the grid for further processing or export.
This approach works for any website that requires user interaction before data can be scraped, and the software adapts its crawling behaviour automatically.
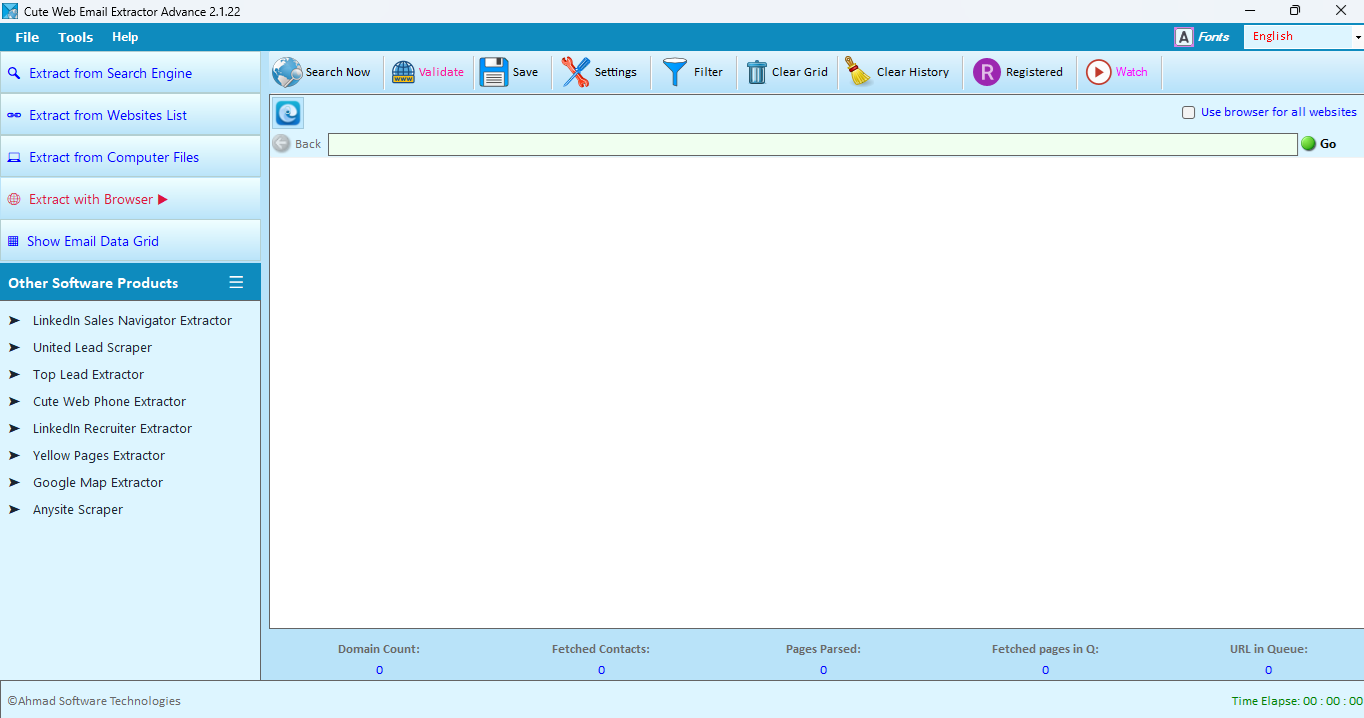 📸 Screenshot: Browser mode panel (as shown in the software)
10. Auto‑Save Directory Management
From File → Set Auto‑save Directory you can create, delete, or select backup folders. Each software instance must use a distinct folder.
What are Auto-Save Directories?
Auto-Save Directories are used to store the software's internal database while extraction sessions are running. The database contains discovered URLs, extracted email addresses, crawl progress, and other information required to restore searches later.
Benefits
- ✓ Automatically saves extraction progress
- ✓ Restores interrupted searches
- ✓ Prevents data loss after system crashes
- ✓ Stores discovered URLs and extracted emails
- ✓ Supports multiple extraction projects
Information Stored
URLs
Discovered URLs and pending URLs waiting to be processed.
Email Addresses
Extracted email addresses collected during searches.
Search Progress
Current crawl status and extraction progress.
Recovery Data
Information required to resume interrupted sessions.
Managing Auto-Save Directories
-
1
Create a Directory
Enter a new directory name and click Add New Directory.
-
2
Select a Directory
Select the directory you want the software to use for storing extraction data.
-
3
Delete Unused Directories
Select an unused directory and click Delete Selected Directory.
-
4
Confirm Settings
Click OK to save your changes.
Important
The software requires at least one Auto-Save Directory to store its working database. Without an Auto-Save Directory, extraction sessions cannot be restored after the program is closed or interrupted.
If you run multiple instances of the software simultaneously, configure a different Auto-Save Directory for each instance to avoid database conflicts.
11. Statistics Panel (Bottom Bar)
- Domain Count – unique domains with extracted emails.
- Fetched Contacts – total emails in grid.
- Pages Parsed – successfully processed pages.
- Fetched pages in Q – pages waiting in parsing queue.
- URL in Queue – URLs waiting to be crawled.
- Time Elapse – HH:MM:SS running time.
 📸 Screenshot: statistics panel (as shown in the software)
12. Complete Settings Reference (Tools → Settings)
⚙️ Settings Dialog – Common Buttons
The following buttons are present at the bottom of every tab in the Settings dialog. They control how changes are applied and saved.
| Button | Description |
|---|---|
| Restore Defaults | Resets all settings on the currently active tab to their original factory values. |
| Fonts | Opens a font selection dialog. Allows you to change the font family, size, and style used throughout the Settings window. Does not affect crawling behaviour. |
| Save All Settings Permanently | Writes the current configuration (across all tabs) to disk. Settings will persist after the software is restarted. Use this after making permanent changes. |
| Apply changes to session only | Applies the current settings for the current extraction session only. When the software is closed, changes are discarded. Useful for temporary testing without altering saved defaults. |
| Close | Closes the Settings dialog. |
 Cute Web Email Extractor)"
class="block border-2 border-slate-300 rounded-lg shadow-sm lazy-image"
onerror="this.style.display='none'"
>
Cute Web Email Extractor)"
class="block border-2 border-slate-300 rounded-lg shadow-sm lazy-image"
onerror="this.style.display='none'"
>
Settings Common Buttons
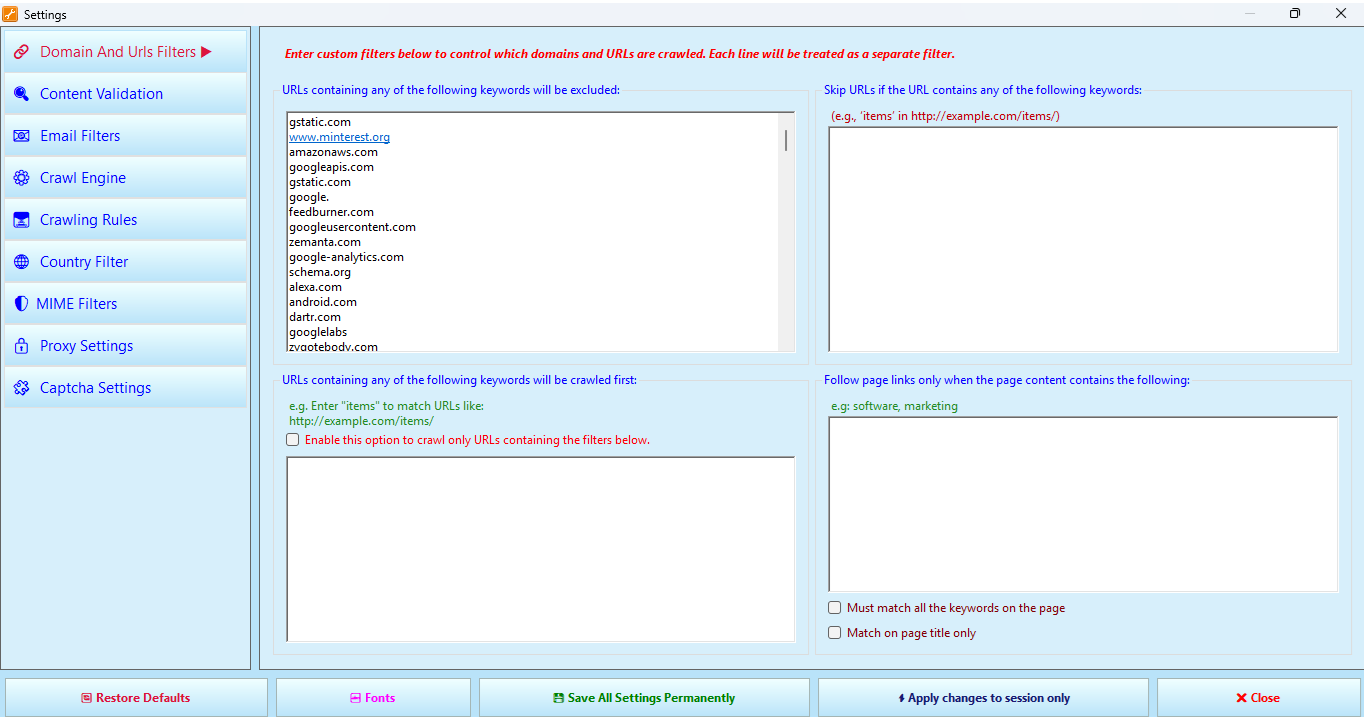
🚫 12.1 Domain and URL Filters
The Domain and URL Filters tab allows you to control which URLs are crawled and how discovered links are prioritized. These filters are applied before pages are added to the crawl queue, helping reduce unnecessary requests, improve performance, and keep extraction focused on relevant content.
 Cute Web Email Extractor)"
class="block border-2 border-slate-300 rounded-lg shadow-sm lazy-image"
onerror="this.style.display='none'"
>
Cute Web Email Extractor)"
class="block border-2 border-slate-300 rounded-lg shadow-sm lazy-image"
onerror="this.style.display='none'"
>
Domain and URL Filters tab.
Enter one keyword, domain, or URL fragment per line. Any URL containing one of these values will be skipped completely and will not be crawled or parsed.
- Useful for excluding advertising networks, analytics services, content delivery networks (CDNs), social media widgets, or other irrelevant URLs.
-
Example entries:
gstatic.com,amazonaws.com,googleapis.com,google-analytics.com,schema.org.
google.com
will exclude all Google URLs, including search result pages.
Enter one keyword per line. URLs containing one of these keywords are given higher priority and are processed before other URLs in the queue.
-
Useful for prioritizing important pages such as
/contact,/about,/team,/support, or/services. -
Example:
entering
contactprioritizes URLs such ashttps://example.com/contact.
When enabled, only URLs matching at least one keyword from the priority list above will be crawled. URLs that do not match are ignored.
Controls whether links found on a page should be added to the crawl queue. If the page does not contain one of the specified keywords, its links will not be followed.
- Enter one keyword per line.
- Email extraction still occurs on the current page even when its links are not followed.
- Useful for keeping the crawler focused on specific topics, industries, products, or services.
- Must match all the keywords on the page – Requires every keyword in the filter list to be present before links from the page are followed.
- Match on page title only – Searches only the page title instead of the full page content. This improves performance but may reduce accuracy.
/product/
to the priority URL list and enable
“Enable this option to crawl only URLs containing the filters below”
.
Then add keywords such as
product,
buy, or
pricing
to
“Follow page links only when the page content contains the following”
.
This keeps the crawler focused on product-related content while avoiding
unrelated sections of the website.
✅ 12.2 Content Validation
This tab allows you to filter which pages are processed for email extraction based on their textual content. You can also pre‑process the page HTML (replace or remove strings) before the extraction starts.
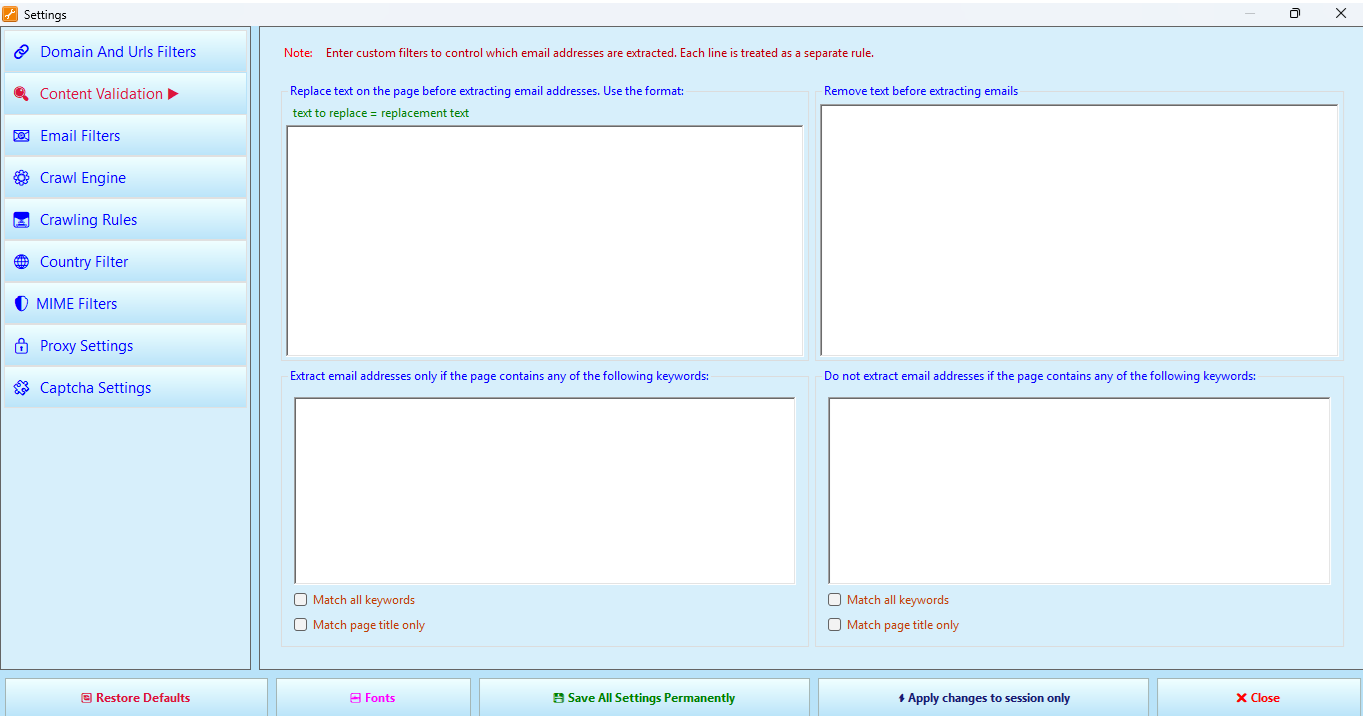
Figure 12.2. Content Validation tab – whitelist/blacklist page content before email extraction.
Use the format text to replace = replacement text. One rule per line. This is useful for decoding obfuscated emails (e.g., [at] = @, (dot) = .). The replacement happens before any keyword matching or email extraction.
AT = @ will turn “user AT example.com” into “user@example.com”.One string per line. Any occurrence of these strings will be completely deleted from the page HTML before any extraction or filtering. Useful for stripping out noise like HTML comments, scripts, or irrelevant boilerplate.
<!-- noemail --> will remove those comment blocks entirely.This is a whitelist. Only pages that contain at least one of these keywords (or all, if “Match all keywords” is checked) will have their emails extracted. Leave empty to disable this filter.
- Match all keywords – requires that the page contains every keyword in the list (AND logic).
- Match page title only – instead of scanning the full page content, only the
<title>tag is examined.
This is a blacklist. Pages that contain any of these keywords (or all, if “Match all keywords” is checked) will be skipped entirely – no emails extracted.
- Match all keywords – requires that the page contains every keyword in the list to be skipped (AND logic).
- Match page title only – restricts the search to the page title.
📋 Field Summary
| Field / Control | Effect |
|---|---|
| Replace text before extraction | Pre‑process HTML: replace specified strings (e.g., obfuscation symbols). |
| Remove text before extraction | Delete specified strings from the page HTML. |
| Extracted email addresses only if page contains keywords | Whitelist – page must contain at least one (or all) of the keywords. |
| Do not extract if page contains keywords | Blacklist – page will be skipped if it contains any (or all) of the keywords. |
| Match all keywords | Requires every keyword to be present (AND logic) instead of any (OR). |
| Match page title only | Restricts keyword search to the HTML <title> element only. |
✉️ 12.3 Email Filters (Detailed)
This tab provides fine‑grained control over which email addresses are accepted or rejected, how obfuscated symbols are decoded, and whether to validate domains or clean the page content.
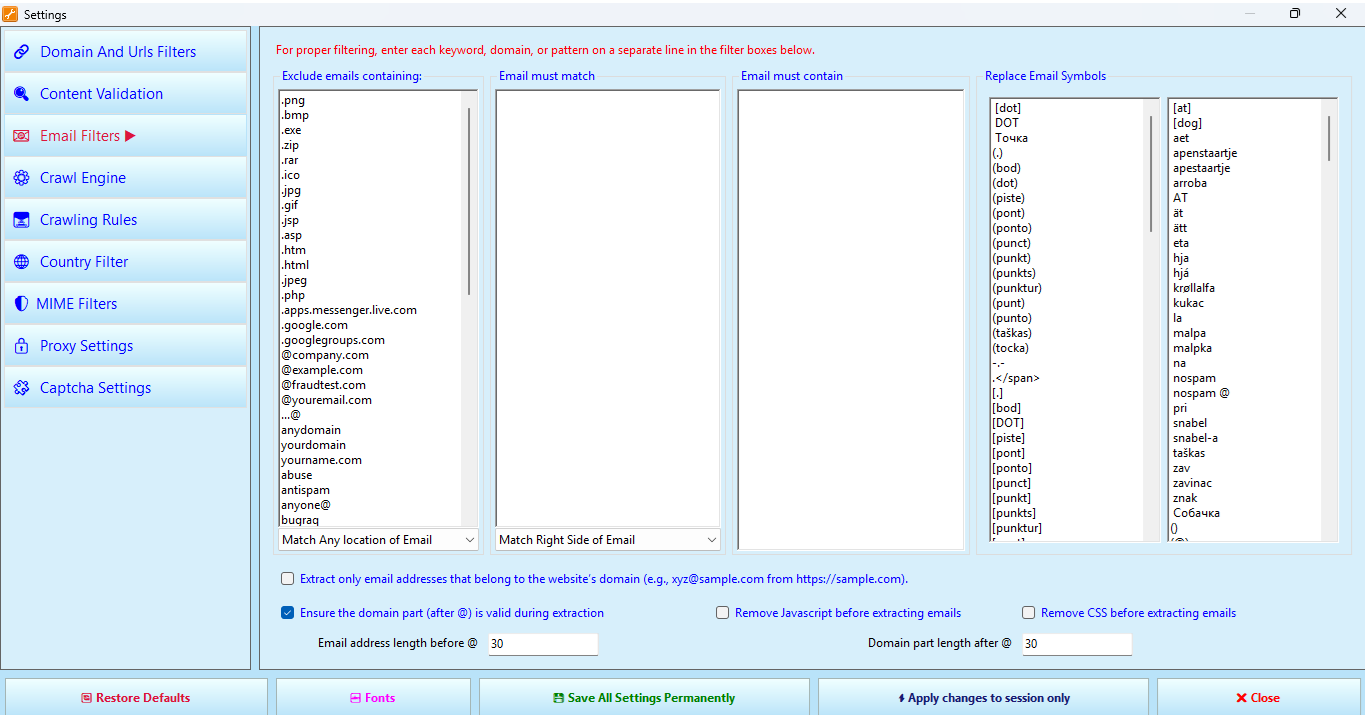
Figure 12.3. Email Filters tab – control which emails are extracted, decode obfuscation, and enable validation.
One keyword, domain, or pattern per line. Any email that contains any of these strings will be rejected. This is useful for filtering out file extensions, common spam domains, or role accounts.
png, exe, google.com, @example.com, abuse, antispam.Only emails whose domain part (after @) matches one of the given patterns will be kept. Leave empty to disable.
@gmail.com will keep only Gmail addresses. @company.com will keep only internal addresses.Email must include at least one of these substrings. This is a whitelist for the email address itself (not the page content).
sales will keep only emails containing “sales” (e.g., sales@domain.com).List of strings to be replaced with @ (for “at” symbols) or . (for dots) before extraction. Each line is a separate pattern. This decodes common obfuscation techniques.
[at], AT, snabel-a → become @; [dot], DOT, punkt → become ..Note: The screenshot shows two separate lists – one for dot variants and one for at variants. The software combines them to normalise obfuscated emails like user[at]example[dot]com into user@example.com.
- Extract only email addresses that belong to the website's domain – Only keep emails where the domain part matches the crawled website’s domain (e.g.,
john@example.comfromhttps://example.com). - Ensure the domain part (after @) is valid during extraction – Performs a DNS lookup (MX record) to verify the domain can receive email. Invalid domains are rejected.
- Remove Javascript before extracting emails – Strips all
<script>tags and their contents from the page HTML before parsing. - Remove CSS before extracting emails – Strips all
<style>tags and CSS content.
Removing JS and CSS reduces false positives (e.g., emails inside code snippets) and improves parsing speed.
📋 Field Summary
| Field / Control | Effect |
|---|---|
| Exclude emails containing (blacklist) | Rejects any email matching any of the listed substrings. |
| Match Right Side of Email (whitelist) | Accepts only emails whose domain matches the given patterns. |
| Email must contain (positive filter) | Email must include at least one listed substring. |
| Replace Email Symbols | Decodes obfuscated “at” and “dot” symbols before extraction. |
| Extract only emails belonging to the website's domain | Restricts extraction to same‑domain emails. |
| Ensure domain part is valid (DNS) | Performs real‑time MX record validation. |
| Remove Javascript / Remove CSS | Strips script/style tags to clean page content. |
🏎️ 12.4 Crawl Engine
This tab configures how the software retrieves and processes web pages, including browser behaviour, delays, scrolling, and resource usage.
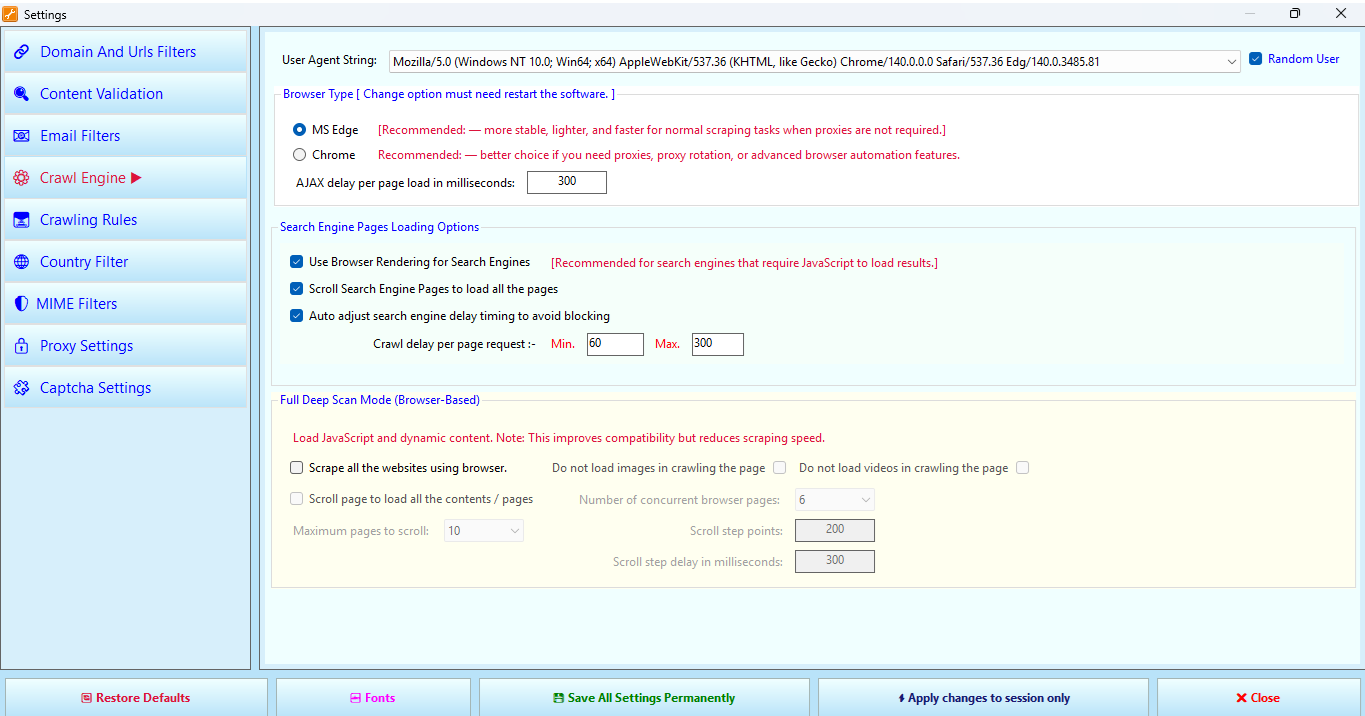
Figure 12.4. Crawl Engine tab – configure browser behaviour, delays, scrolling, and deep scan.
The browser identity sent to web servers. Changing this can help avoid blocking. The screenshot shows a modern Edge/Chrome agent string.
Mozilla/5.0 (Windows NT 10.0; Win64; x64) AppleWebKit/537.36 ...Note: Changing this option requires a software restart.
- MS Edge – Recommended for normal scraping tasks without proxies. More stable, lighter, and faster.
- Chrome – Recommended if you need proxies, proxy rotation, or advanced browser automation features.
Wait time after a page loads before extracting content. Increase for heavy JavaScript sites to allow dynamic content to render. Default: 300 ms.
- Use Browser Rendering for Search Engines – Enables full browser rendering for search engine result pages (needed for Google, Bing, etc.). Recommended for engines that require JavaScript.
- Scroll Search Engine Pages to load all the pages – Simulates scrolling to load infinite results or “load more” buttons.
- Auto adjust search engine delay timing to avoid blocking – Randomises delays between requests to reduce the risk of IP bans.
Load JavaScript and dynamic content. This improves compatibility with modern websites but reduces scraping speed.
- Scrape all the websites using browser – Enables browser rendering for every page, not just search engines.
- Do not load images in crawling the page – Speeds up rendering and reduces bandwidth.
- Do not load videos in crawling the page – Similarly, blocks video content.
- Scroll page to load all the contents / pages – Simulates scrolling to trigger lazy‑loaded content.
- Number of concurrent browser pages – How many browser instances run in parallel (default 6). Increase with caution.
- Maximum pages to scroll – How many “scroll steps” to perform on a single page (default 10).
- Scroll step points – Pixels to scroll each time (default 200).
- Scroll step delay in milliseconds – Pause between scroll steps (default 300 ms).
📋 Field Summary
| Field / Control | Effect |
|---|---|
| User Agent String | Identifies the browser to web servers; can bypass simple blocks. |
| Browser Type (Edge / Chrome) | Edge is lighter/faster; Chrome supports proxy rotation and advanced automation. |
| AJAX delay (ms) | Wait time for dynamic content to load after page ready. |
| Use Browser Rendering for Search Engines | Enables JS rendering for search result pages (required for Google, Bing). |
| Scroll Search Engine Pages | Simulates scrolling to load all results. |
| Auto adjust delay to avoid blocking | Randomises delays to avoid pattern detection. |
| Full Deep Scan (browser for all sites) | Renders every page with a browser – slower but necessary for SPAs. |
| Do not load images / videos | Increases speed by skipping media. |
| Scroll page to load all contents | Activates infinite scroll simulation. |
| Concurrent browser pages | Number of simultaneous browser instances. |
| Maximum pages to scroll, step points, step delay | Fine‑tunes the auto‑scrolling behaviour. |
📏 12.5 Crawling Rules
This tab controls the crawler’s behaviour, limits, and adherence to web standards. If you are not familiar with technical details, it is recommended to leave the default values unchanged.
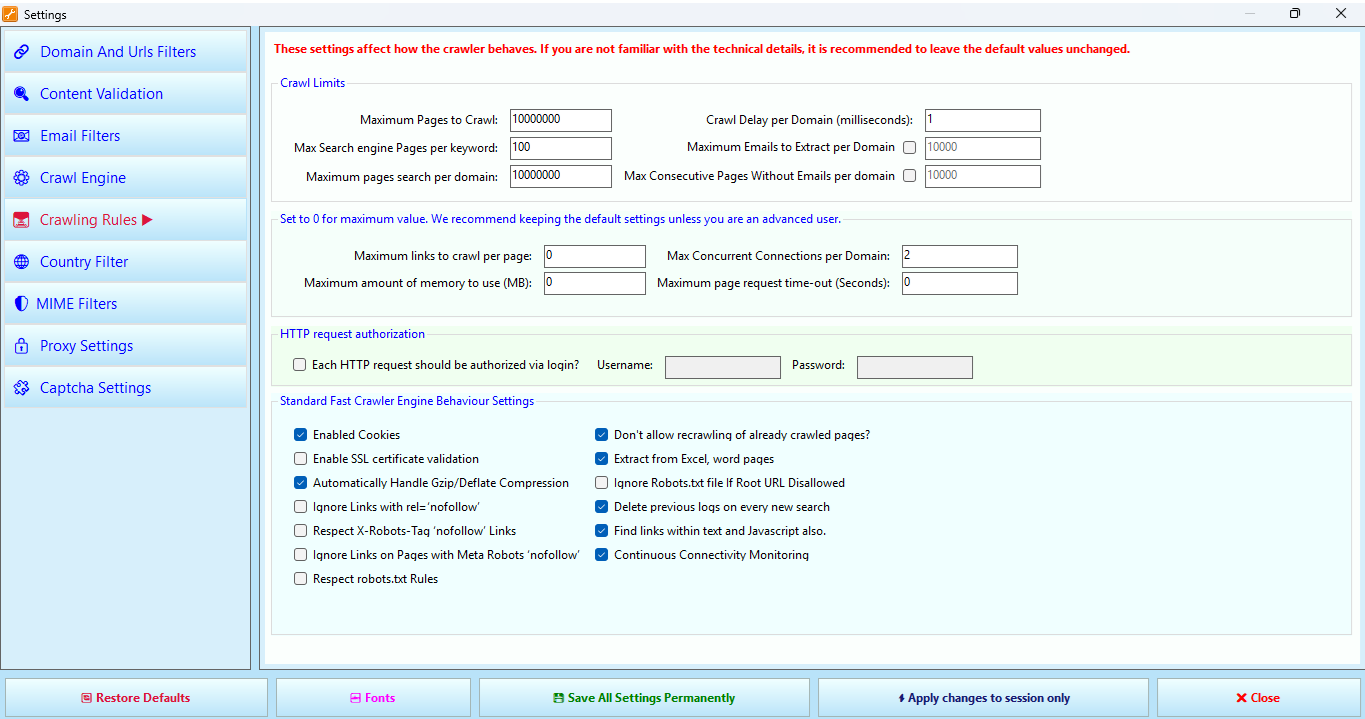
Figure 12.5. Crawling Rules tab – limits, authorisation, and crawler behaviour flags.
- Maximum Pages to Crawl: Global limit across all domains. Default 10,000,000 (practically unlimited).
- Max Search engine Pages per keyword: How many result pages to fetch per search keyword. Default 100.
- Maximum pages search per domain: Stop crawling a single domain after N pages. Default 10,000,000.
- Maximum Exhaustive Pages Without Emails per domain: Deprecated / similar to the next setting. (Kept for compatibility.)
- Crawl Delay per Domain (milliseconds): Minimum time between requests to the same domain (1 ms default). Increase to avoid overloading servers or being blocked.
- Maximum Emails to Extract per Domain: Stop extracting from a domain after N emails. Default 10,000.
- Max Consecutive Pages Without Emails per domain: If a domain returns no emails for N consecutive pages, it is abandoned. Default 10,000.
- Maximum links to crawl per page: Limits the number of links extracted from a single page. 0 = unlimited.
- Maximum amount of memory to use (MB): Soft memory limit. 0 = no limit.
- Maximum page request time-out (Seconds): HTTP timeout. 0 = default (~30 seconds).
Check “Each HTTP request should be authorized via login?” to enable basic authentication. Then provide a Username and Password. This is required for password‑protected websites.
- Enabled Cookies – Maintains cookies across requests (essential for sessions).
- Don't allow crawling of already crawled pages? – Skips visited URLs to prevent loops.
- Enable SSL certificate validation – Verifies HTTPS certificates (recommended ON).
- Extract from Excel, word pages – Parses .docx, .xlsx files (slower).
- Automatically Handle Gzip/Deflate Compression – Reduces bandwidth (ON).
- Ignore Robots.txt file if Root URL Disallowed – Bypasses robots.txt restrictions (use with caution).
- Ignore Links with rel='nofollow' – If ON, still crawl nofollow links. If OFF, respect them.
- Delete previous logs on every new search – Starts a fresh log file each extraction.
- Respect X-Robots-Tag 'nofollow' Links – Obeys the HTTP header `X-Robots-Tag: nofollow`.
- Find links within text and Javascript also – Extracts URLs from inline JavaScript (may increase false positives).
- Ignore Links on Pages with Meta Robots 'nofollow' – If ON, ignores meta robots directives.
- Continuous Connectivity Monitoring – Pauses crawling when internet is lost, resumes automatically.
- Respect robots.txt Rules – Standard compliance (recommended ON).
📋 Field Summary
| Field / Control | Effect |
|---|---|
| Maximum Pages to Crawl | Global crawl limit (0 = unlimited). |
| Max Search engine Pages per keyword | Number of search result pages per keyword. |
| Maximum pages per domain | Stop after N pages on a single domain. |
| Crawl Delay per Domain (ms) | Minimum time between requests to the same domain. |
| Maximum Emails per Domain | Stop extracting from a domain after N emails. |
| Max Consecutive Pages Without Emails | Abandon domain after N empty pages. |
| HTTP request authorization | Enable basic authentication (username/password). |
| Behaviour checkboxes | Various options to control cookie handling, robots.txt respect, nofollow, link extraction, logging, etc. |
🌍 12.6 Country Filter
This tab allows you to restrict crawling to specific countries based on top‑level domains (TLDs). It is useful for targeting local businesses or avoiding irrelevant international results.
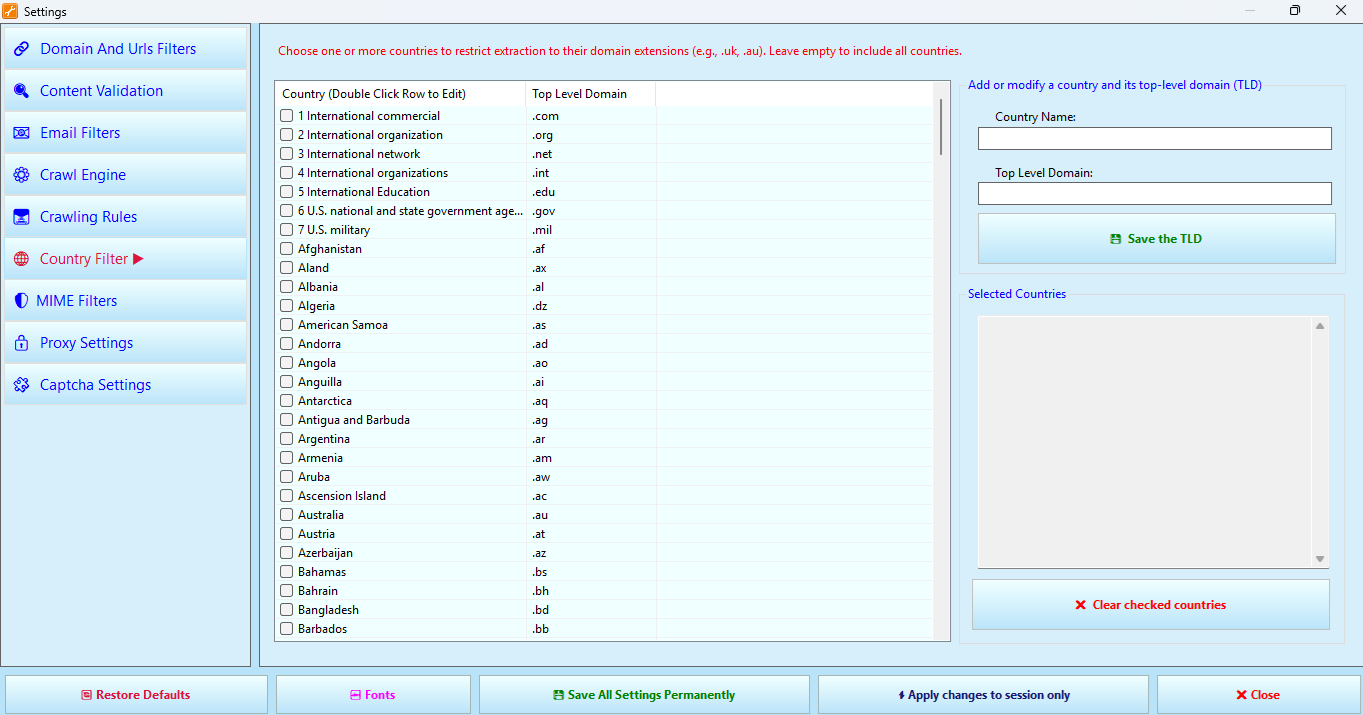
Figure 12.6. Country Filter tab – restrict crawling to specific TLDs.
A list of countries with their corresponding top‑level domains. Double‑click a row to select or deselect that country. Selected countries will be used to filter crawled domains.
| Country (Double Click Row to Edit) | Top Level Domain |
|---|---|
| 1 International commercial | .com |
| 2 International organization | .org |
| 3 International network | .net |
| 4 International organizations | .int |
| 5 International Education | .edu |
| 6 U.S. national and state government agencies | .gov |
| 7 U.S. military | .mil |
| Afghanistan | .af |
| Åland Islands | .ax |
| Albania | .al |
| Algeria | .dz |
| American Samoa | .as |
| Andorra | .ad |
| Angola | .ao |
| Anguilla | .ai |
| Antarctica | .aq |
| Antigua and Barbuda | .ag |
| Argentina | .ar |
| Armenia | .am |
| Aruba | .aw |
| Ascension Island | .ac |
| Australia | .au |
| Austria | .at |
| Azerbaijan | .az |
| Bahamas | .bs |
| Bahrain | .bh |
| Bangladesh | .bd |
| Barbados | .bb |
The list continues beyond what is shown; scroll down to see all countries.
- Country Name: (label) – the currently highlighted country in the table.
- Top Level Domain: (label) – the corresponding TLD of the highlighted country.
- Save the TLD: Button – adds the currently highlighted TLD to the filter list. Effectively selects that country.
- Selected Countries: (label) – shows the list of countries (or TLDs) that have been chosen.
- Clear checked countries: Button – removes all selected countries, returning to “include all countries” mode.
📋 Field Summary
| Field / Control | Effect |
|---|---|
| Country / TLD table | Displays all available countries and their TLDs. Double‑click to select/deselect. |
| Save the TLD | Adds the TLD of the highlighted country to the filter list. |
| Selected Countries (label) | Shows the currently selected TLDs (or countries). |
| Clear checked countries | Removes all selections, disables country filtering. |
🎞️ 12.7 MIME Filters & Auto‑Save
This tab controls which file types the crawler processes and how automatic backups behave. Filtering out unnecessary MIME types improves extraction speed and reduces bandwidth.
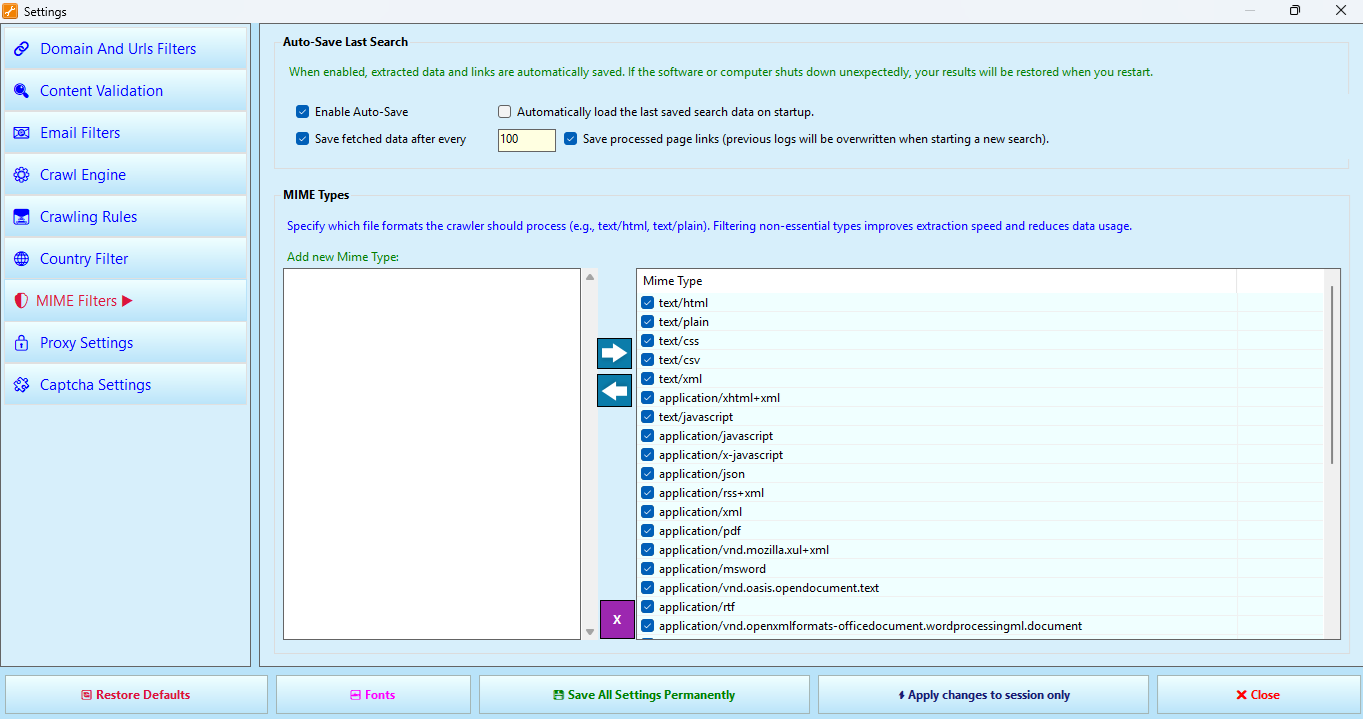
Figure 12.7. MIME Filters & Auto‑Save tab – control which file types are processed and backup behaviour.
When enabled, extracted data and links are automatically saved. If the software or computer shuts down unexpectedly, your results will be restored when you restart.
- Enable Auto‑Save – Master switch for automatic backup.
- Save fetched data after every [X] items – Number of emails after which the grid is saved (default 100).
- Automatically load the last saved search data on startup – Restores previous session when the software launches.
- Save processed page links – Also stores the list of crawled URLs (previous logs will be overwritten when starting a new search).
Specify which file formats the crawler should process (e.g., text/html, text/plain). Filtering non‑essential types improves extraction speed and reduces data usage.
| Mime Type | Description |
|---|---|
| text/html | HTML pages |
| text/plain | Plain text files |
| text/css | CSS stylesheets |
| text/csv | CSV files |
| text/xml | XML documents |
| application/xhtml+xml | XHTML documents |
| application/javascript | JavaScript files |
| application/json | JSON data |
| application/rss+xml | RSS feeds |
| application/xml | Generic XML |
| application/pdf | PDF documents |
| application/vnd.mozilla.xul+xml | XUL interfaces |
| application/vnd.oasis.opendocument.text | OpenDocument text |
| application/vnd.openxmlformats-officedocument.wordprocessingml.document | Microsoft Word (DOCX) |
Add new Mime Type: Type a custom MIME string (e.g., application/vnd.ms-excel) and click the add button (not shown in screenshot, but present in the actual interface).
📋 Field Summary
| Field / Control | Effect |
|---|---|
| Enable Auto‑Save | Turns automatic backup on/off. |
| Save fetched data after every X items | Frequency of auto‑save (number of new emails). |
| Automatically load last saved search on startup | Restores previous session automatically. |
| Save processed page links | Backs up crawled URL list. |
| MIME Types table | Lists allowed content types; crawler only processes these. |
| Add new Mime Type | Adds a custom MIME to the allowed list. |
text/html, text/plain, application/pdf if you need those formats. Enable Auto‑Save with a low threshold (e.g., 100) to protect against data loss.
🔒 12.8 Proxy Settings
This tab allows you to configure HTTP proxies for anonymous crawling, rotating IP addresses, or accessing geo‑restricted content. Only HTTP proxies are supported (not SOCKS).
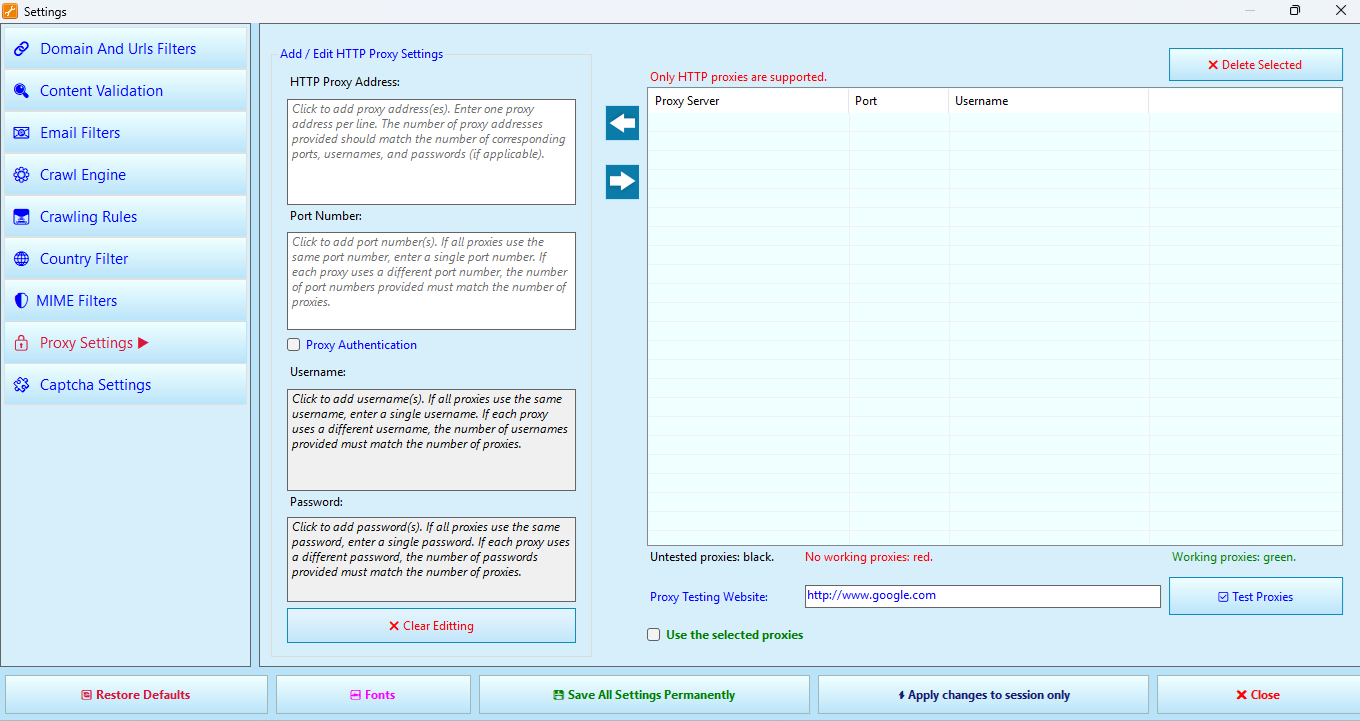
Figure 12.8. Proxy Settings tab – configure HTTP proxies for anonymous crawling.
Each field can contain multiple lines. The number of lines in each field must match (or be 1 if the same value applies to all proxies).
- HTTP Proxy Address: One IP or domain per line. Example:
192.168.1.100orproxy.example.com. The number of addresses should match the number of ports, usernames, and passwords. - Port Number: One port per line, or a single port if all proxies use the same port. Example:
8080. - Username (Proxy Authentication): One username per line, or a single username for all proxies. Leave blank if no authentication required.
- Password: One password per line, or a single password for all proxies.
Displays the currently configured proxies with their server address, port, and username. Double‑click a row to edit.
| Proxy Server | Port | Username |
|---|---|---|
| (empty – add proxies using the fields above) | ||
Delete Selected: Highlight a row in the table and click this button to remove it.
📋 Field Summary
| Field / Control | Effect |
|---|---|
| HTTP Proxy Address | One IP or domain per line. Matched by line number to ports/credentials. |
| Port Number | One port per line, or single port for all proxies. |
| Username / Password | Optional authentication credentials. One per line or single for all. |
| Proxy List Table | Shows configured proxies; double‑click to edit; Delete Selected removes rows. |
| Restore Defaults | Clears all proxy settings. |
| Save / Apply buttons | Persist or temporarily apply proxy configuration. |
🤖 12.9 Captcha Settings
This tab allows you to define keywords that indicate a CAPTCHA page and choose how the software reacts when one is detected. Proper configuration helps avoid getting stuck on blocked pages.
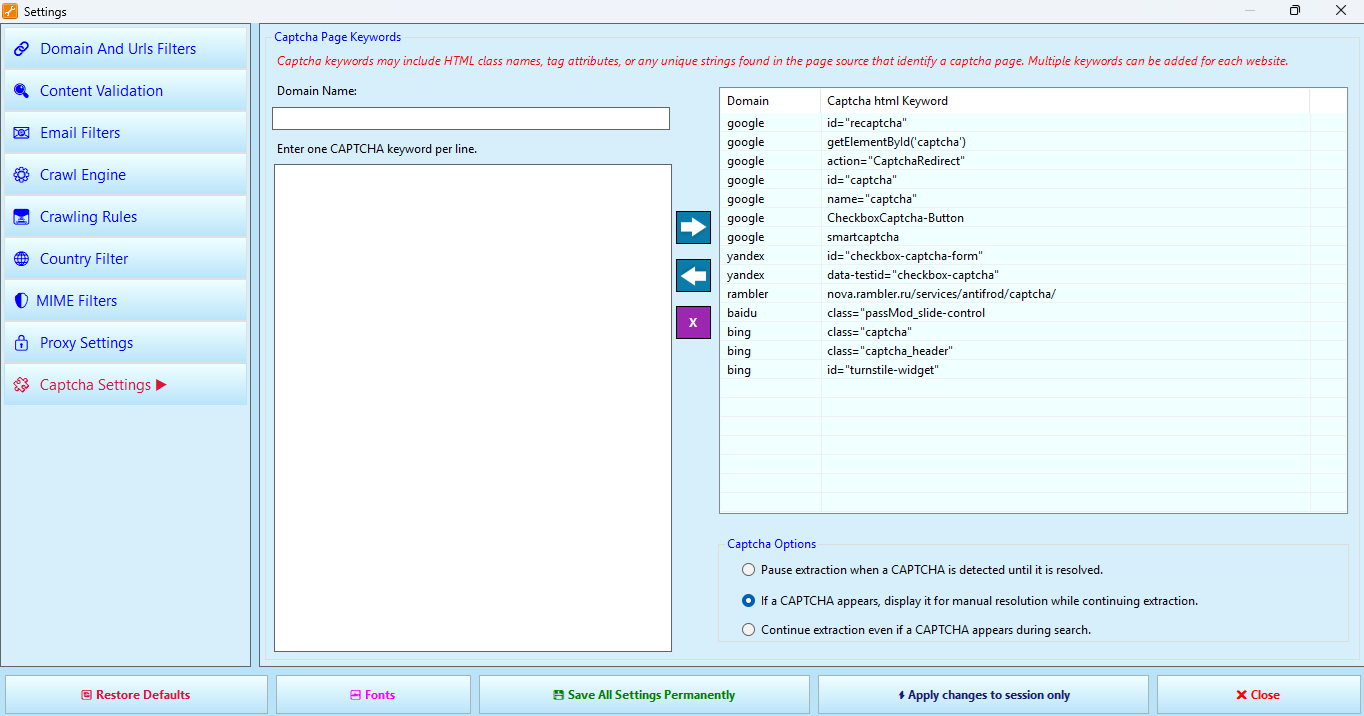
Figure 12.9. Captcha Settings tab – define CAPTCHA indicators and choose handling behaviour.
Captcha keywords may include HTML class names, tag attributes, or any unique strings found in the page source that identify a captcha page. Multiple keywords can be added for each website.
| Domain Name | Associated Keywords (examples) |
|---|---|
name="captcha", CheckboxCaptcha-Button, smartcaptcha, id="checkbox-captcha-form", data-testid="checkbox-captcha", class="captcha", id="turnstile-widget" | |
| rambler.ru | nova.rambler.ru/services/antifrod/captcha/, class="passMod_slide-control" |
| (other domains) | Add your own keywords based on HTML inspection. |
To add a new keyword: select a domain from the dropdown (or type a new domain), enter a keyword, and click the add button (interface not fully shown in screenshot but present in the software).
- Pause extraction when a CAPTCHA is detected until it is resolved. – Completely stops all crawling activity and waits for the user to manually solve the CAPTCHA (e.g., in the built‑in browser). Extraction resumes only after the CAPTCHA is solved.
- If a CAPTCHA appears, display it for manual resolution while continuing extraction. – Shows the CAPTCHA in a separate window, but other browser instances keep working. This is the recommended option for large‑scale scraping.
- Continue extraction even if a CAPTCHA appears during search. – Ignores CAPTCHA pages. The crawler will skip the blocked page and move on, but no data will be extracted from that domain.
📋 Field Summary
| Field / Control | Effect |
|---|---|
| Domain Name dropdown/list | Select or type the website domain for which you want to add CAPTCHA keywords. |
| Captcha keywords (per domain) | List of strings that identify a CAPTCHA page (HTML IDs, class names, URLs, etc.). |
| Pause extraction until resolved | Stops all activity, waits for manual CAPTCHA solving. |
| Display CAPTCHA while continuing | Shows CAPTCHA in a pop‑up but other browsers keep crawling. |
| Continue extraction (ignore CAPTCHA) | Skips the blocked page, no extraction from that domain. |
class="g-recaptcha", id="captcha", name="captcha". Choose the second option (“display it for manual resolution while continuing extraction”) so that you can solve CAPTCHAs without stopping the entire crawl.
13. Regional Settings Dialog
Available in Search Engine mode via Click to do Regional Settings. Allows selecting country, state/province, up to three cities, and specific area. Options:
Opens the Regional Settings dialog, allowing you to target searches to specific geographic locations. Regional targeting helps improve search relevance and discover websites associated with a particular country, region, city, or local area.
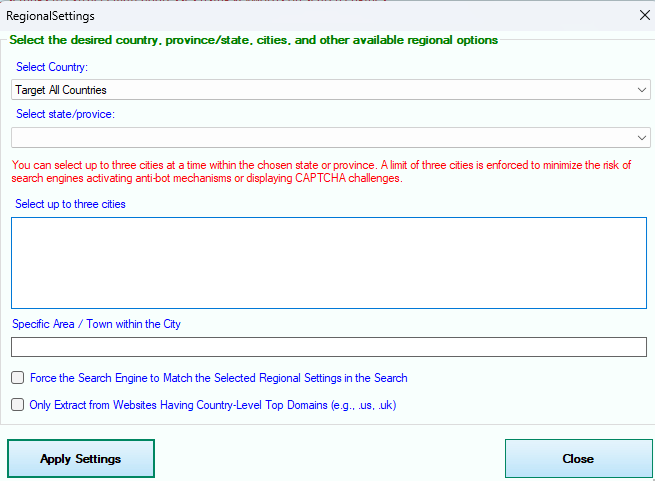
Figure 1. Regional Settings window
Available Location Filters
Restrict searches to a specific country.
Focus searches within a selected state or province.
Target up to three cities simultaneously.
Further narrow searches to a specific local area.
Additional Options
Instructs the search engine to prioritize results matching the selected regional settings whenever possible.
Extract emails only from websites using country-specific
top-level domains such as .us,
.uk, .ca, .au,
or .de.
14. Additional Filter Dialogs
📧 Enable Email Search Filters Dialog
This dialog appears when you check “Enable Email Search Filters” in the Search Engine advanced options. It lets you define which pages are considered valid for email extraction based on their content and optional geographic fields.
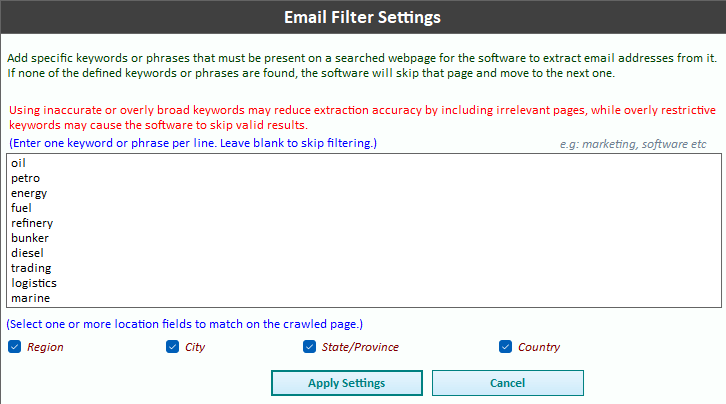
Figure 14.1. Enable Email Search Filters dialog – define page‑level content and location filters.
Enter one keyword or phrase per line. Leave blank to skip filtering. The software checks the page’s full HTML (or title, depending on other settings) for any of these keywords.
marketing, software, contact us, sales@These checkboxes tell the software to also check the page for specific location information (if present in the HTML, e.g., from the keyword row’s Region/City/Province/Country columns). When checked, the page must match the corresponding location value in addition to the keyword filter.
- Region – match the keyword row’s region field.
- City – match the keyword row’s city field.
- State/Province – match the keyword row’s province/state field.
- Country – match the keyword row’s country field.
Apply Settings – saves the current keyword and location field selections for the current session.
Cancel – closes the dialog without saving any changes.
📋 Field Summary
| Field / Control | Effect |
|---|---|
| Keywords / Phrases (multi‑line) | Only pages containing at least one of these strings will yield email extraction. Leave empty to disable. |
| Region checkbox | Require the page to match the keyword row’s region value. |
| City checkbox | Require the page to match the keyword row’s city value. |
| State/Province checkbox | Require the page to match the keyword row’s province/state. |
| Country checkbox | Require the page to match the keyword row’s country. |
| Apply Settings | Save and use the current filter configuration. |
| Cancel | Discard changes and close the dialog. |
🔗 Enable Page Links Filters Dialog
This dialog appears when you check “Enable Page Link Filters” in the Search Engine advanced options. It lets you control which pages have their links crawled based on the page’s content.
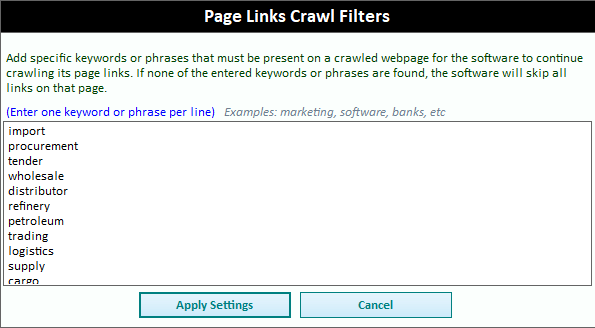
Figure 14.2. Enable Page Links Filters dialog – control which pages have their links crawled.
Enter one keyword or phrase per line. The software checks the page’s full HTML for any of these keywords. If a match is found, the page’s links are followed; otherwise, all links on that page are ignored.
import, procurement, tender, wholesale, distributor, refinery, petroleum, trading, logistics, supply, raron
Apply Settings – saves the current keyword list for the current session.
Cancel – closes the dialog without saving any changes.
📋 Field Summary
| Field / Control | Effect |
|---|---|
| Keywords / Phrases (multi‑line) | Only pages containing at least one of these keywords will have their links followed. If empty, all links are followed. |
| Apply Settings | Saves the keyword list and enables the filter for the current extraction. |
| Cancel | Discards changes and closes the dialog. |
💡 15. Best Practices & Troubleshooting
🚀 Performance Optimization
- Adjust concurrency wisely: Start with 30 crawler threads and 8 parser threads (defaults). Increase crawler threads to 50–80 on high‑bandwidth connections, but keep parser threads lower (10–15) to avoid CPU overload.
- Disable unnecessary assets: In Crawl Engine → Full Deep Scan Mode, check “Do not load images” and “Do not load videos”. This dramatically speeds up browser‑based crawling.
- Choose the right browser type: Use MS Edge for normal HTTP crawling (lightweight, fast). Switch to Chrome only when you need proxy rotation or advanced automation.
- Reduce AJAX delay for fast sites: Lower “AJAX delay per page load” to 100–200 ms for static pages. Increase to 1000–3000 ms for heavy JavaScript sites.
- Limit concurrent browser pages: When using “Scrape all websites using browser”, set “Number of concurrent browser pages” to 2‑4 on older machines to prevent memory exhaustion.
- Filter MIME types: In MIME Filters, remove types you don’t need (e.g., images, CSS, JSON) to reduce bandwidth and processing time.
🛡️ Avoiding IP Bans & CAPTCHAs
- Use proxy rotation: Configure multiple HTTP proxies in Proxy Settings and enable “Use the selected proxies”. Also select Chrome browser type for full proxy support.
- Enable auto‑adjust delay: In Crawl Engine, check “Auto adjust search engine delay timing” – this randomises request intervals to avoid pattern detection.
- Increase crawl delay: In Crawling Rules, set “Crawl Delay per Domain” to 1000–3000 ms when targeting aggressive sites.
- Respect robots.txt: Keep “Respect robots.txt Rules” enabled (default) to avoid being blocked by site policies.
- Rotate user agents: Use the built‑in random user‑agent feature (under Crawl Engine) to avoid fingerprinting.
- Handle CAPTCHAs gracefully: In Captcha Settings, choose “If a CAPTCHA appears, display it for manual resolution while continuing extraction”. This lets you solve CAPTCHAs without stopping the entire crawl.
💾 Data Safety & Recovery
- Enable Auto‑Save: In MIME Filters tab, check “Enable Auto‑Save” and set a reasonable interval (e.g., after every 100 emails). This protects against crashes.
- Use separate auto‑save folders for multiple instances: Each running copy of the software must have its own auto‑save directory (configured via File → Set Auto‑save Directory). Sharing a folder corrupts session data.
- Load last search after crash: Use File → Load Last Search Results to restore your grid, queue, and logs.
- Regularly export your grid: Click Save Email Addresses periodically to external Excel/CSV files as an additional backup.
- Save URL lists: Use File → Save the last search URLs list in file to export discovered URLs for later resumption.
🐞 Common Errors and Solutions
| Error / Symptom | Likely Cause & Solution |
|---|---|
| Empty email grid | Target site uses heavy JavaScript. Enable Full Deep Scan Mode (Crawl Engine) and/or use Extract with Browser mode. Also check your Content Validation whitelist – maybe too restrictive. |
| “WebView2 runtime not found” | Microsoft Edge WebView2 is not installed. Download from Microsoft and install the Evergreen Runtime. |
| CAPTCHA appears repeatedly | Increase crawl delay, enable proxy rotation, and set CAPTCHA handling to “display and continue”. Solve manually when prompted. |
| License validation fails | Check your internet connection. If persistent, copy the Software Serial Key from the Registration dialog and your purchase order number and email aslogger@ahmadsoftware.com. |
| Slow crawling or high memory usage | Reduce “Number of concurrent browser pages” to 2‑4. Lower “Maximum pages to scroll” to 5. Disable image/video loading. Set a memory limit in Crawling Rules. |
| Extracted emails contain [at] or (dot) | Add those strings to Replace Email Symbols in the Email Filters tab (e.g., “[at] = @”, “(dot) = .”). |
| Crawler stops after few pages | You may be blocked. Enable proxy rotation, increase crawl delay, and enable auto‑adjust delay. Also check “Continuous Connectivity Monitoring” in Crawling Rules. |
| No results from search engines (Google, Bing) | Enable Use Browser Rendering for Search Engines in Crawl Engine. Also ensure you have not excluded “google.com” in Domain/URL Filters. |
⚙️ Recommended Settings for Different Scenarios
| Scenario | Recommended Configuration |
|---|---|
| Fast scraping of static sites | Browser type: MS Edge, Full Deep Scan: OFF, Crawler threads: 50, Parser threads: 10, AJAX delay: 0, Crawl delay: 100 ms, Disable images/videos. |
| JavaScript-heavy sites (SPAs) | Browser type: Chrome, enable Full Deep Scan with “Scrape all websites using browser”, Concurrent browser pages: 4, Scroll steps: 300, AJAX delay: 1000 ms. |
| Anonymous scraping (avoid blocks) | Use proxy rotation (HTTP proxies + Chrome browser type), enable auto‑adjust delay, crawl delay: 2000‑5000 ms, enable “Respect robots.txt”, CAPTCHA handling: “display and continue”. |
| Local file extraction (PDF, DOCX, XLSX) | No special settings – just add files/folders in Computer Files mode. For large files, ensure memory limit is set to 1024 MB or higher. |
| Targeted extraction (specific countries/TLDs) | Use Country Filter to select desired TLDs (e.g., .de, .fr). Also use Regional Settings in Search Engine mode with location fields. |
| High‑volume extraction (millions of pages) | Increase “Maximum Pages to Crawl” to 0 (unlimited). Use fast crawling settings (MS Edge, no browser rendering). Enable auto‑save every 1000 items. Use a powerful machine with 16+ GB RAM. |
✅ Quick Troubleshooting Checklist
- Are you using the latest version? Check Help → Check For Updates.
- Is WebView2 runtime installed? (Required for browser mode and search engine rendering).
- Is your firewall blocking the software? Add exceptions for the executable.
- Have you set a valid auto‑save directory? (Without it, session recovery is impossible).
- Are your proxy settings correct? Test them with Test Proxies button.
- Are your email filters too strict? Temporarily disable them to see if emails appear.
- Is the target website still online? Try opening it in a normal browser.
For further assistance, refer to the online help (Help → Help) or contact support at aslogger@ahmadsoftware.com.
16. Support & Contact
Website: www.ahmadsoftware.com
Email: aslogger@ahmadsoftware.com
Video tutorials: Click Watch button in the software.